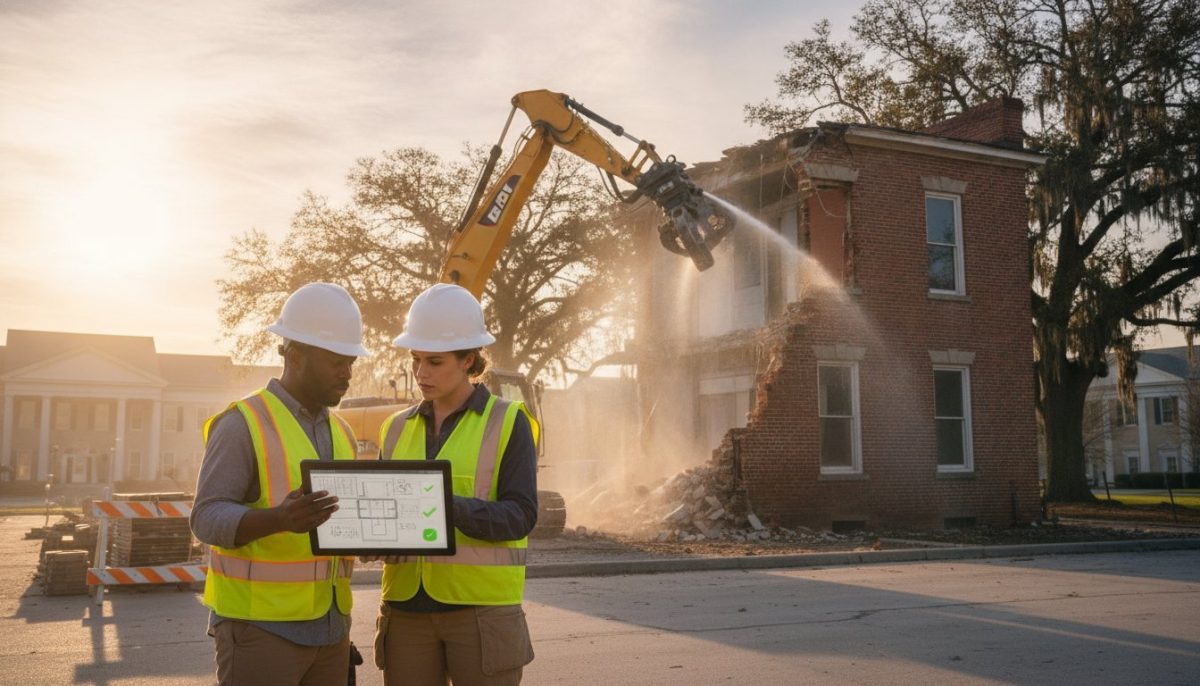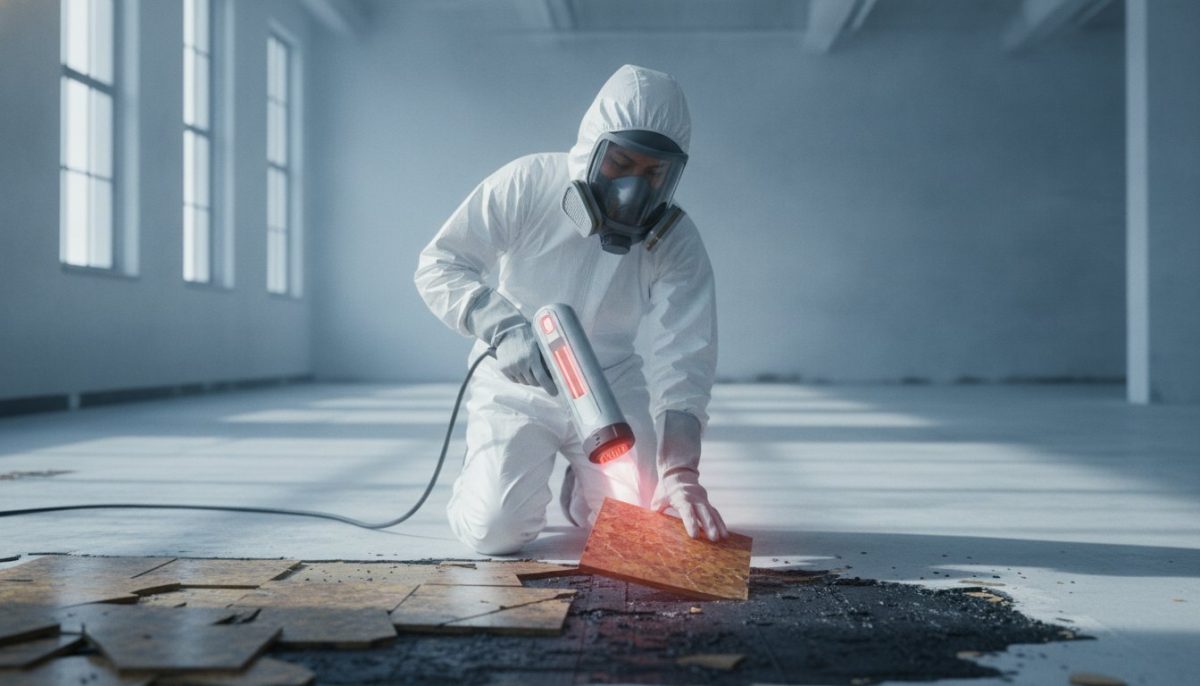
A contractor uncovers a patch of suspicious, gray insulation behind a basement wall, and suddenly, your timeline and budget feel like they’re in freefall. This scenario is a reality for many property owners, especially as the EPA shifts its 2026 regulatory focus toward managing legacy asbestos in older structures. It’s natural to feel a surge of anxiety regarding your team’s health and the potential for crushing legal fines. You need to know exactly what happens if asbestos is found during renovation to keep the site safe and the project moving forward legally.
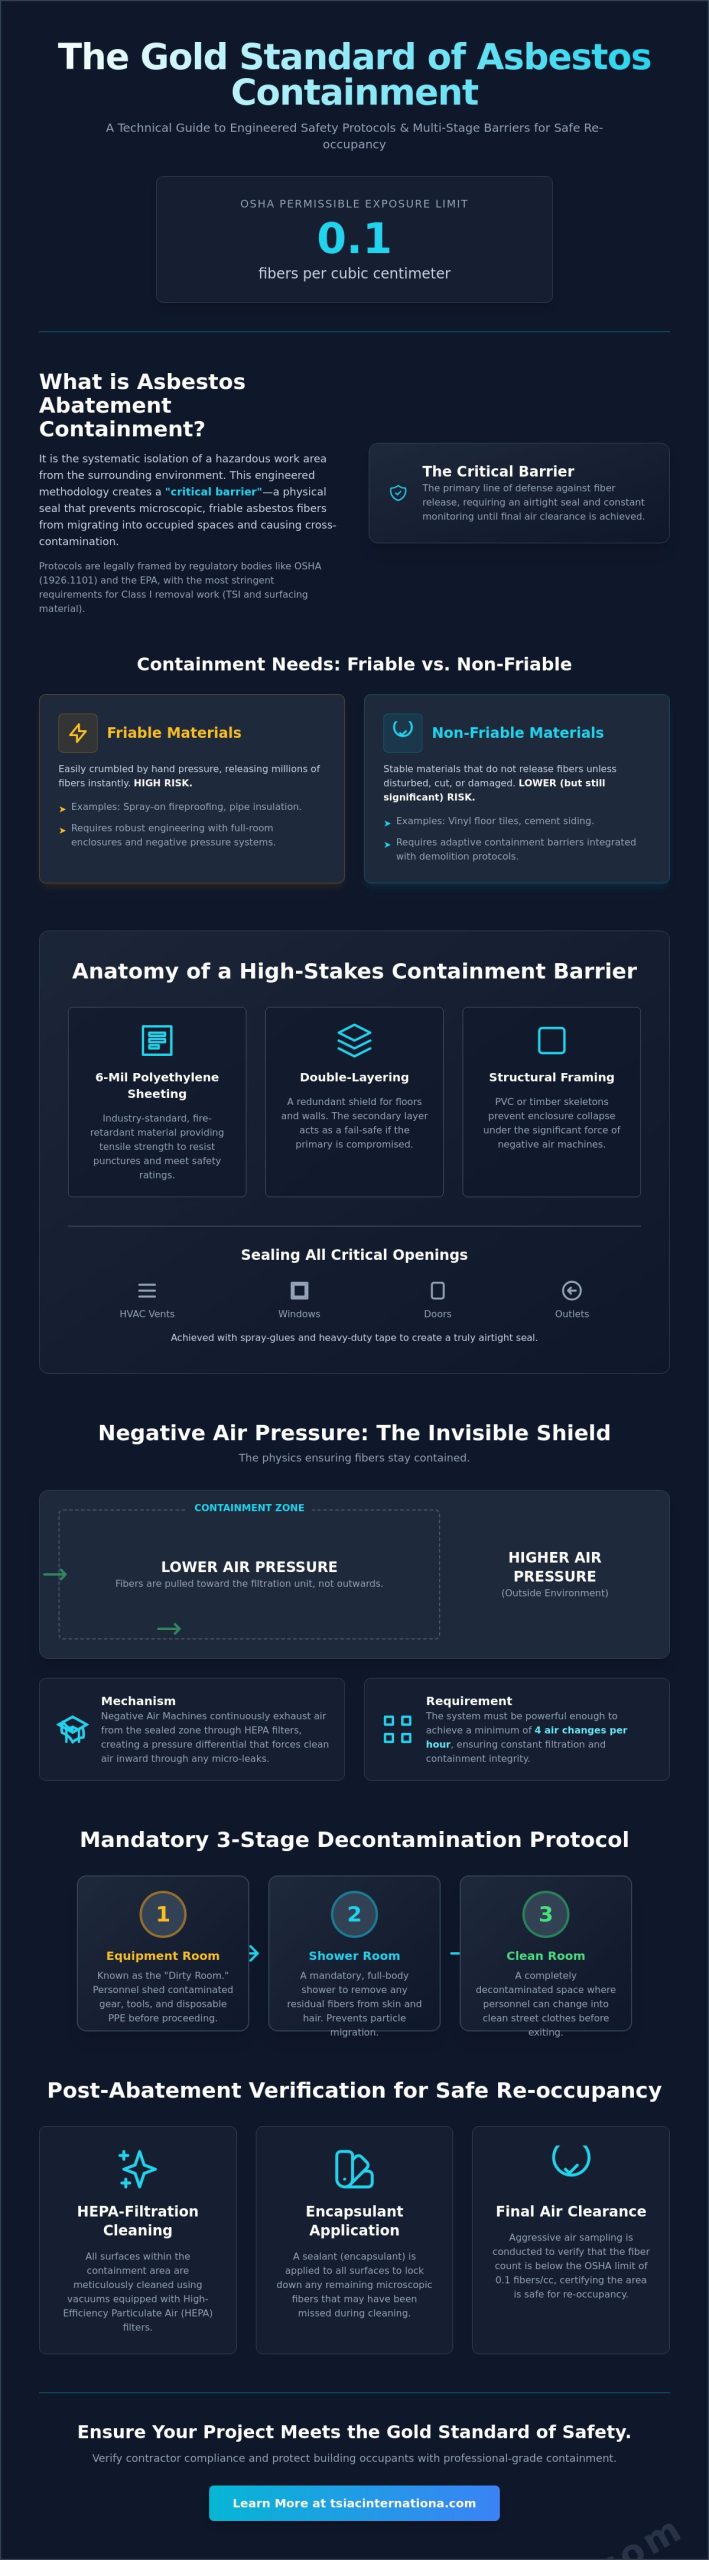
We understand that encountering hazardous materials isn’t just a technical hurdle; it’s a significant liability risk that requires a disciplined, methodical response. This guide delivers the exact 2026 safety and operational protocols necessary to handle a discovery without panic. You’ll learn the mandatory steps for immediate site containment, how to navigate OSHA’s permissible exposure limit of 0.1 fibers per cubic centimeter, and the professional abatement process that ensures full regulatory compliance. By following this structured approach, you can transform a potential project-killer into a controlled, professionally managed pivot point.
Key Takeaways
- Learn the mandatory immediate steps for site containment, including the cessation of all construction activity and the establishment of restricted access zones to prevent fiber migration.
- Understand exactly what happens if asbestos is found during renovation regarding material classification and the critical distinction between friable and non-friable hazards.
- Explore the technical requirements of professional abatement, including the deployment of negative pressure enclosures and HEPA-filtered air filtration systems.
- Ensure full regulatory compliance with 2026 EPA and OSHA standards to mitigate property owner liability and meet strict permissible exposure limits.
- Discover how professional abatement serves as a strategic investment to preserve structural integrity and property value during complex interior gutting projects.
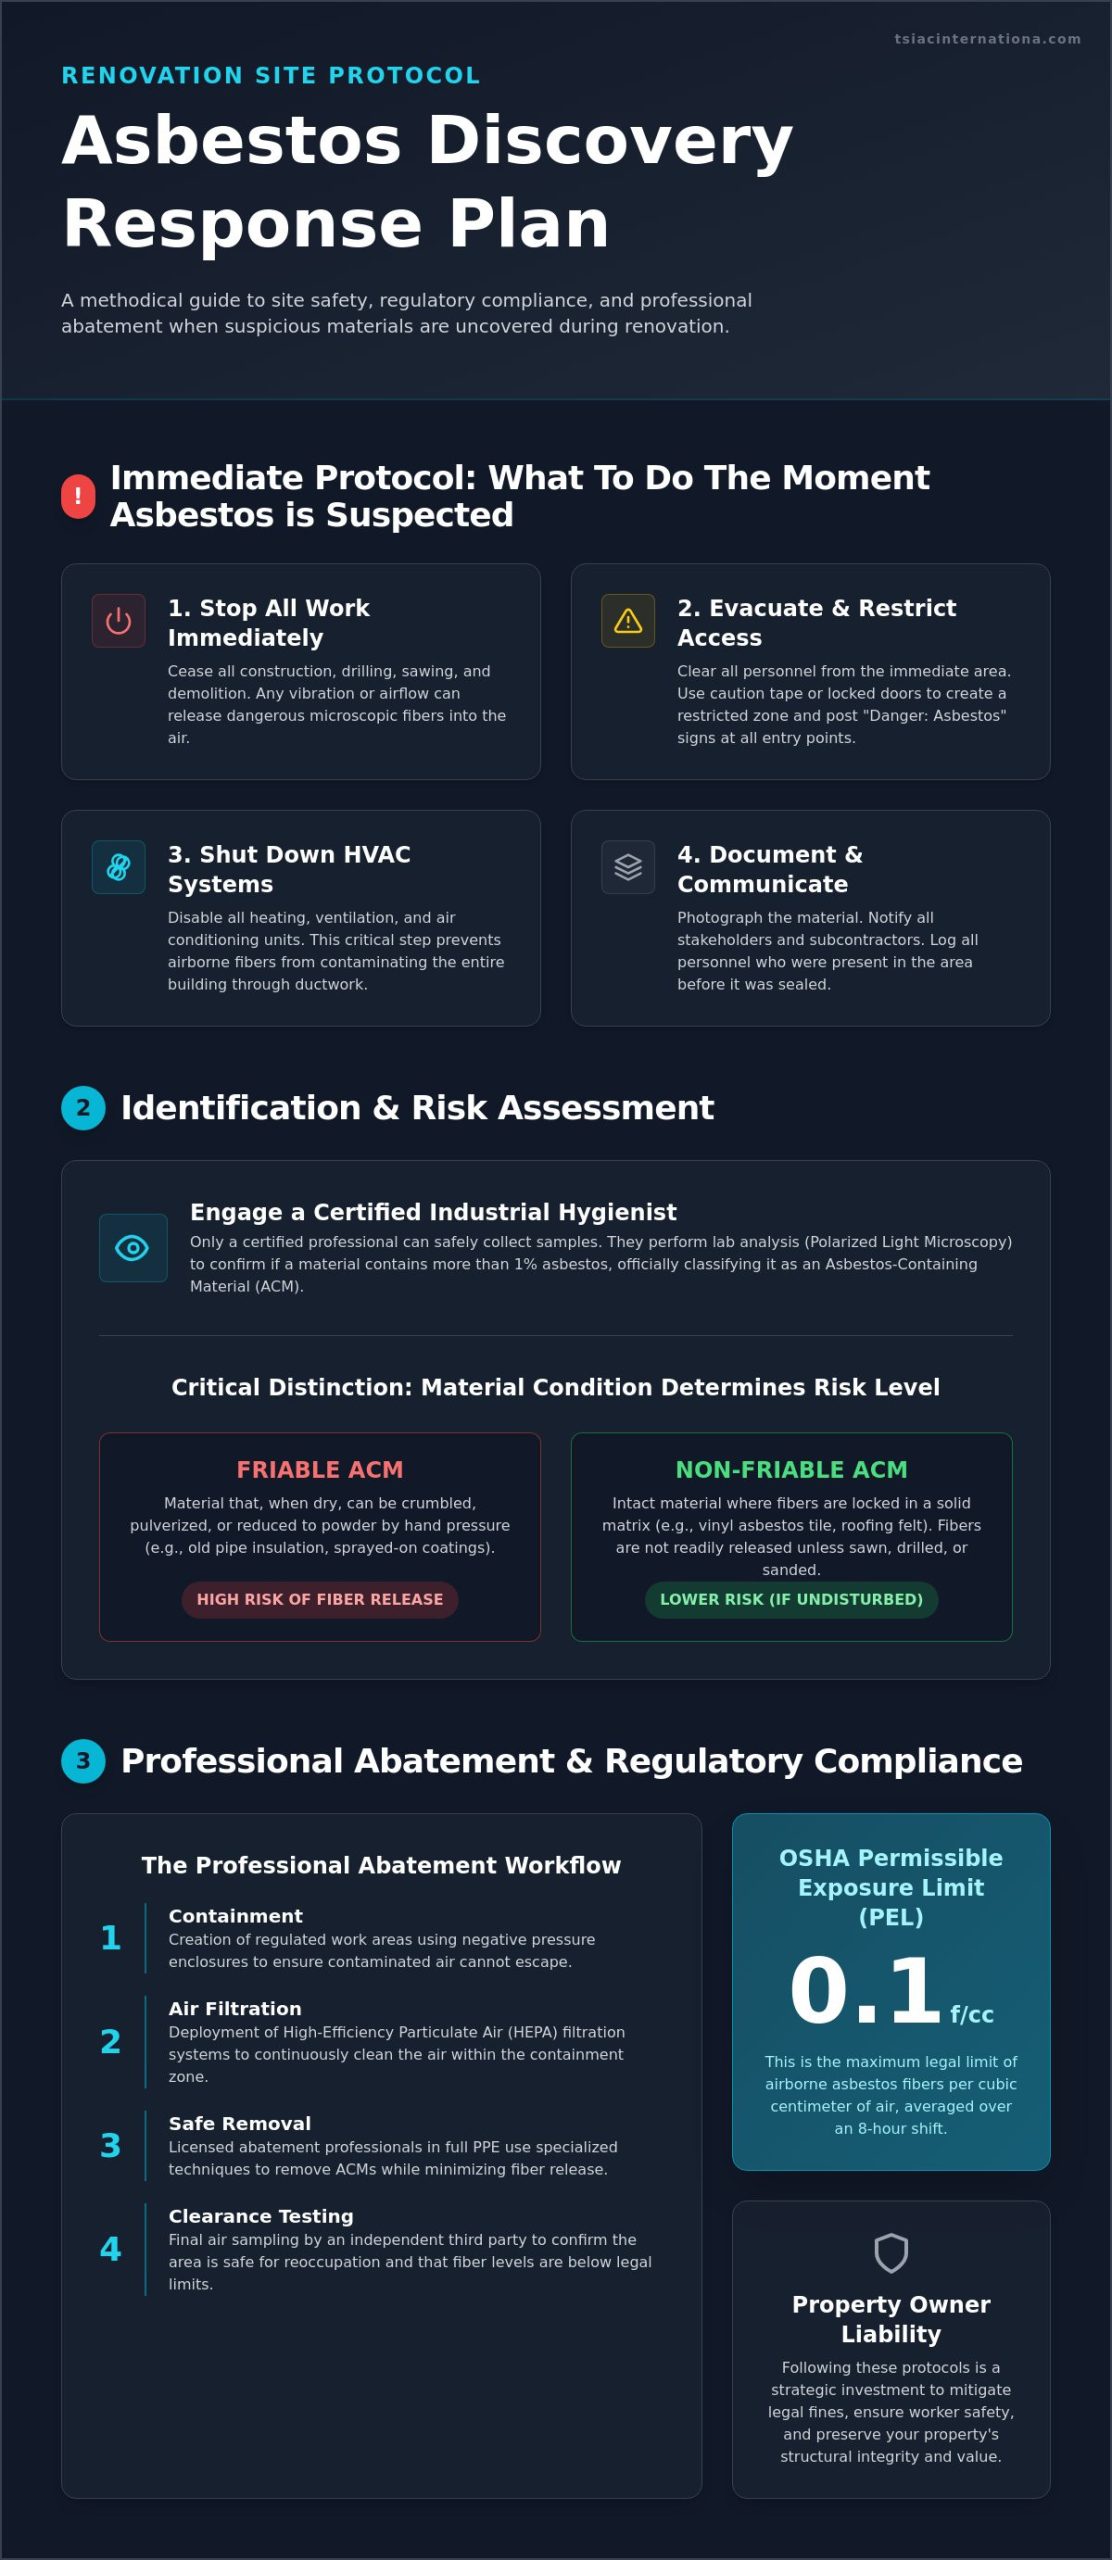
Immediate Protocol: What to Do the Moment Asbestos is Suspected
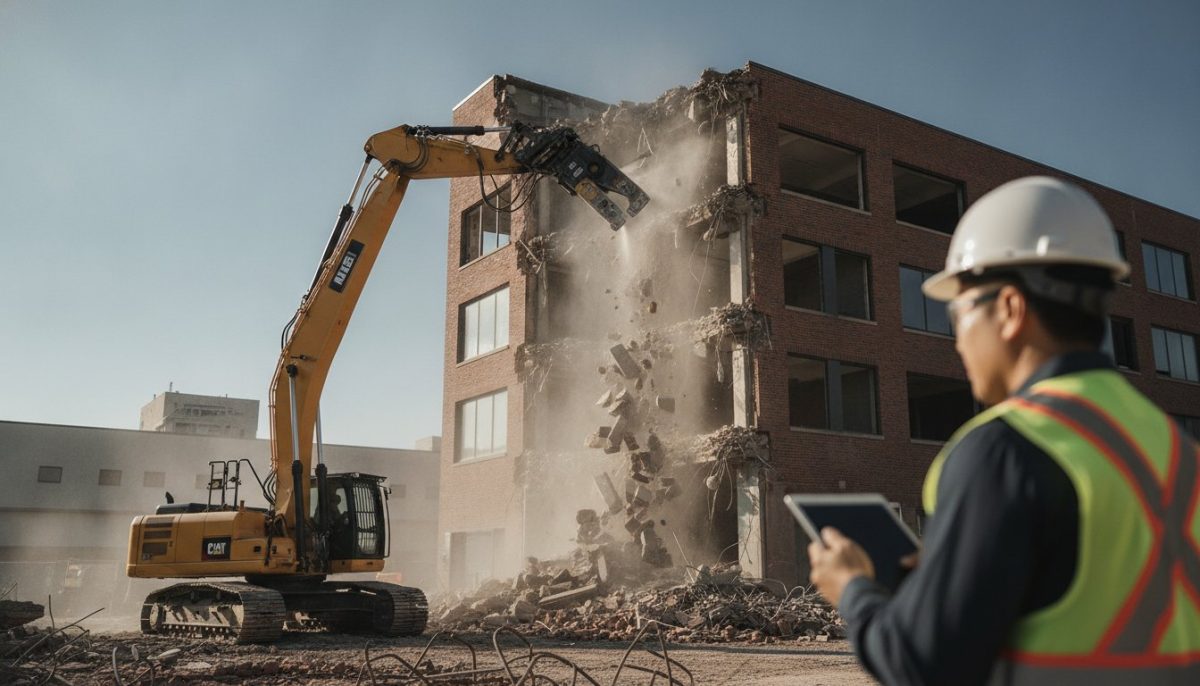
The discovery of suspicious material requires an immediate and total halt to all mechanical activity. Whether a worker uncovers friable pipe insulation or brittle floor tile backing, the first priority is to prevent further disturbance. Understanding what happens if asbestos is found during renovation starts with acknowledging that vibration and airflow are your primary enemies. Continued drilling, sawing, or demolition releases microscopic fibers into the air, creating a contaminated environment that is significantly more difficult and expensive to remediate. You don’t wait for lab results to stop work; you stop the moment the suspicion arises.
Evacuation of the immediate zone is the next non-negotiable step. All personnel must leave the area, and access should be restricted using temporary physical barriers like caution tape or locked doors. Simultaneously, you must disable the building’s HVAC system. Airborne fibers travel through ductwork with ease, which can quickly contaminate rooms far removed from the initial discovery site. For a comprehensive overview of asbestos and its microscopic structure, it’s clear why these fibers remain suspended in the air for hours or even days. Turning off the air handling units is a critical containment measure that protects the entire property’s air quality.
Compliance also requires clear, visible communication. Post “Danger: Asbestos” signage at every entry point to the restricted zone. These signs serve as a legal shield and a vital safety warning for subcontractors or inspectors who might otherwise enter the area unprotected. Maintaining this perimeter is essential for site control until a professional assessment can be conducted.
Initial Containment Measures
If the suspicious material is already damaged or crumbling, use a fine mist of water to dampen the surface. This increases the weight of the fibers and helps keep them from becoming airborne. You should seal the affected area using 6-mil polyethylene plastic sheeting and heavy-duty duct tape to create a temporary vapor barrier. Never use a standard shop vacuum or a broom to clean up dust. These tools lack the specialized filtration needed to trap microscopic particles; they simply aerosolize the hazardous dust, making the environment toxic for everyone on-site.
Communicating with the Renovation Team
Transparency is essential for managing liability and worker safety. Notify every subcontractor and stakeholder of the potential hazard and the current site status immediately. It’s helpful to document the exact location and physical state of the material with photographs before the area is fully sealed, as this provides vital data for the inspector. Finally, maintain a detailed log of every individual who was present in the room during the initial disturbance. This record is a standard requirement for long-term health monitoring, ensuring that what happens if asbestos is found during renovation is handled with methodical, professional precision.
Identifying Asbestos-Containing Materials (ACMs) During Construction
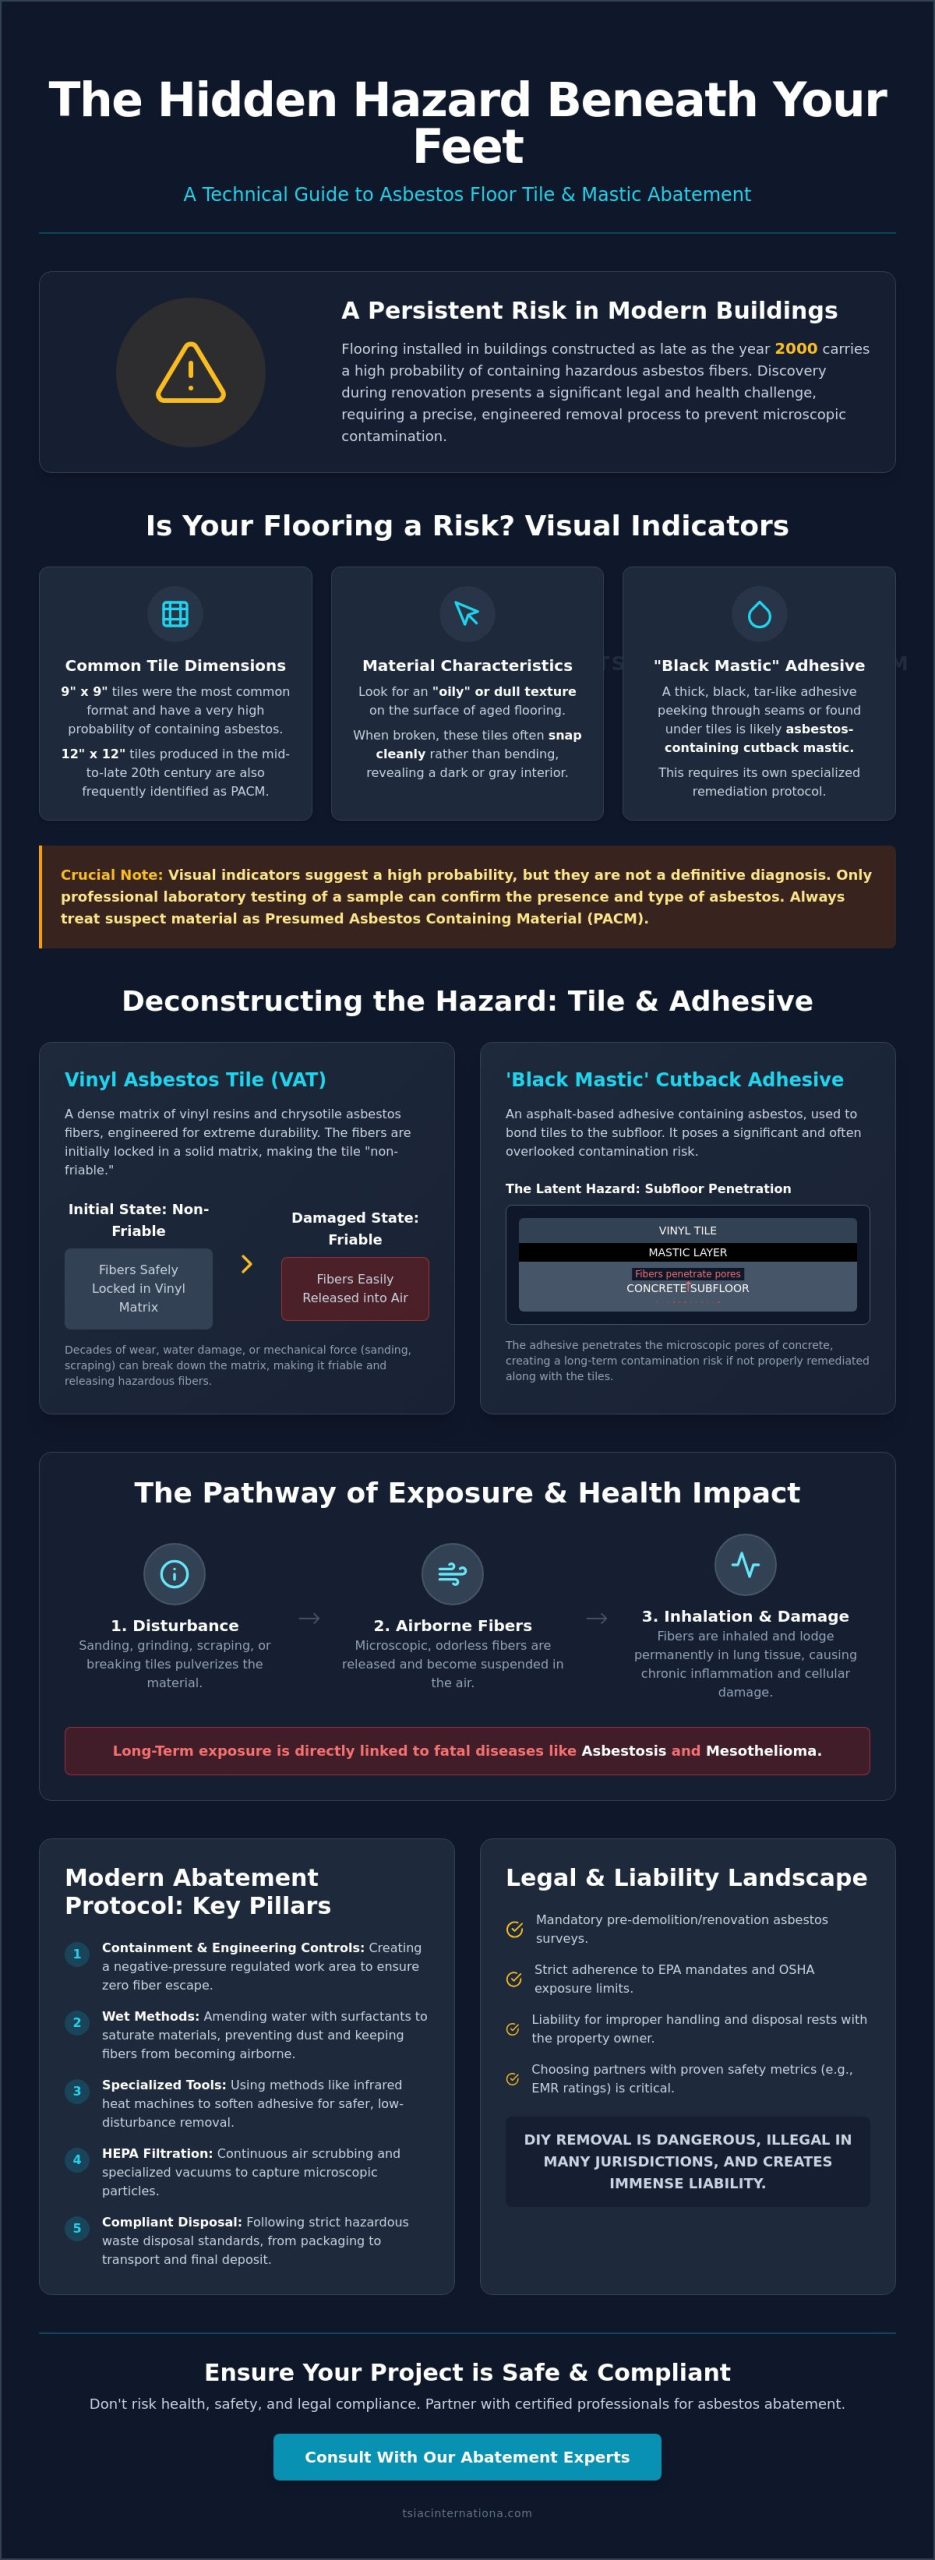
The technical definition of an Asbestos-Containing Material (ACM) is any substance that consists of more than 1% asbestos by weight. While this might seem like a small fraction, even trace amounts pose severe respiratory risks when disturbed. Knowing what happens if asbestos is found during renovation requires a shift from visual guesswork to laboratory-grade analysis. You cannot identify these fibers with the naked eye. Instead, a Certified Industrial Hygienist must collect physical samples for Polarized Light Microscopy (PLM) to confirm the mineral’s presence and concentration. Building owners must strictly adhere to federal requirements for renovation and demolition to ensure these materials are identified before they’re disturbed.
A professional identification process involves more than just testing; it requires a comprehensive risk assessment of the material’s condition. The role of the industrial hygienist is to determine if the substance is intact or damaged, and whether it’s likely to release fibers into the air during the planned work. This expert evaluation forms the basis of the entire abatement strategy. Integrating a professional survey into your commercial interior gutting services ensures that these hidden hazards are managed before demolition begins, preventing costly environmental contamination and project delays.
Common Locations for Hidden Asbestos
Asbestos was historically utilized in thousands of building products due to its thermal resistance and tensile strength. In structural components, it’s frequently found in pipe lagging, boiler insulation, and fireproofing sprays. Interior finishes often hide asbestos in popcorn ceiling textures, vinyl floor tiles, and joint compounds used in drywall systems. Exterior elements aren’t exempt either; cement siding, roofing felt, and window glazing or caulking often contain significant percentages of the mineral. Understanding what happens if asbestos is found during renovation involves recognizing that these materials can be layered, requiring a methodical inspection of every building envelope component.
Understanding Friable vs. Non-Friable Materials
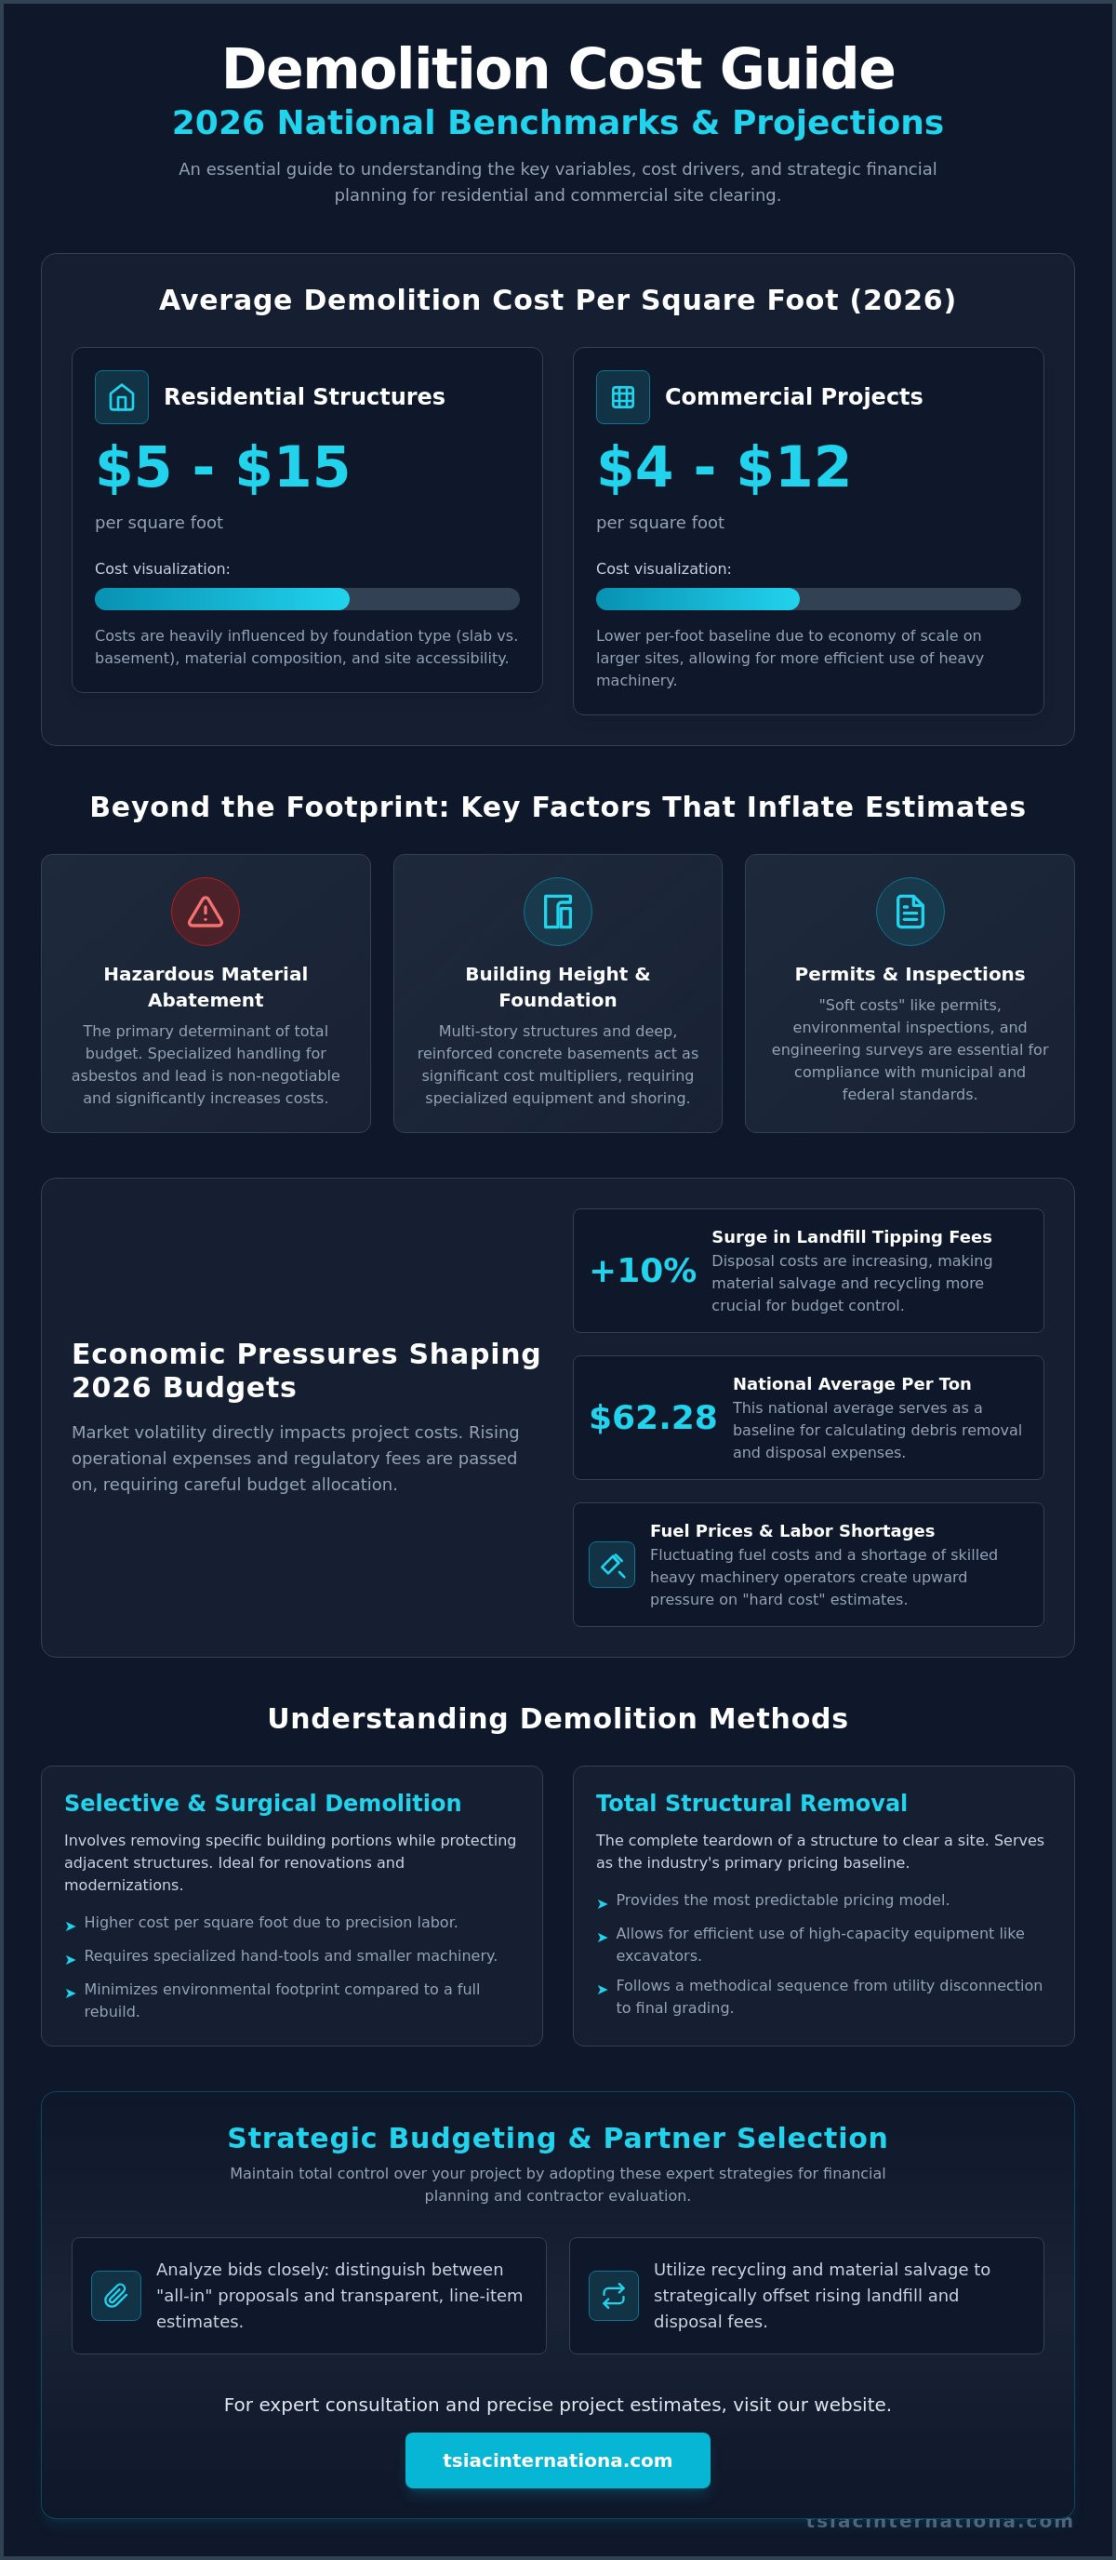
The distinction between friable and non-friable materials is the most critical factor in risk assessment. Friable materials pose the highest risk because they’re easily broken and release fibers upon the slightest touch. Non-friable materials, such as floor tiles or cement board, are generally stable but become hazardous when subjected to mechanical forces like grinding, sawing, or sanding. Friability is the tendency of a material to crumble under hand pressure. When a non-friable material is damaged during construction, it’s often reclassified as friable, mandating much stricter containment and handling protocols to protect the site’s atmosphere.
The Professional Abatement Workflow: From Containment to Clearance
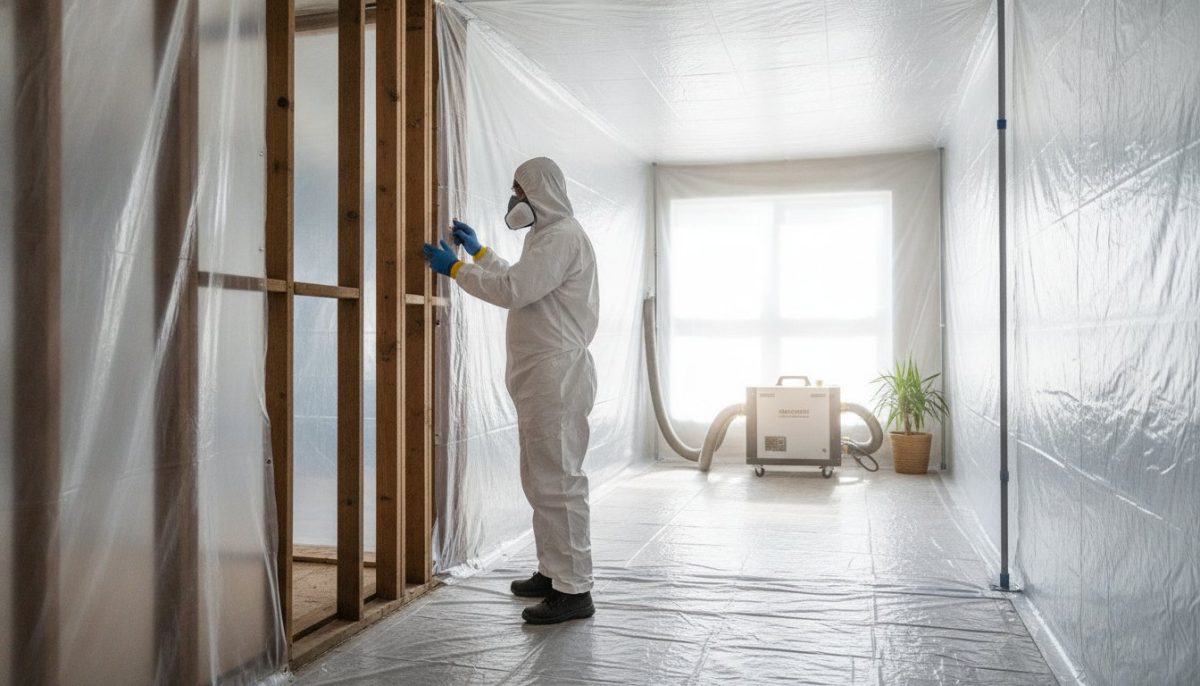
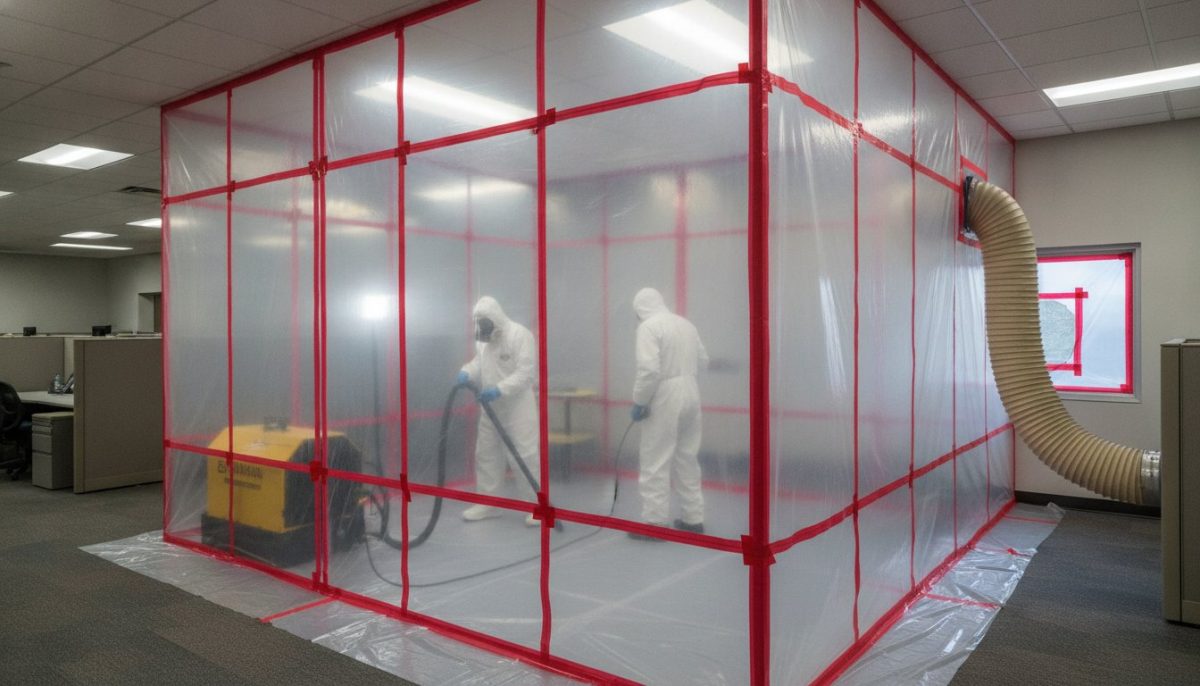
Once identification is complete, the project transitions into a highly regulated engineering phase. Understanding the technical workflow of what happens if asbestos is found during renovation is vital for maintaining project safety and legal standing. Professional abatement isn’t a simple removal process; it’s a disciplined exercise in environmental control. The primary objective is to isolate the work zone from the rest of the building using a negative pressure enclosure. By using high-volume air pressure differentials, technicians ensure that air always flows into the containment area and never out into occupied spaces, effectively trapping microscopic particulates at the source.
The backbone of this containment strategy is the installation of HEPA-filtered air filtration units. These machines continuously scrub the atmosphere within the enclosure, capturing 99.97% of particles as small as 0.3 microns. Workers enter and exit through a three-stage decontamination unit. This system consists of a “dirty” room for removing contaminated suits, a shower room for thorough rinsing, and a “clean” room for donning fresh personal protective equipment (PPE). This rigorous protocol prevents the tracking of fibers into non-regulated areas of the property. The actual removal involves surgical precision, utilizing wet-method techniques where surfactants are applied to keep materials saturated, coupled with HEPA-shrouded power tools that vacuum dust at the point of impact.
Advanced Containment Strategies
- Glove Bags: For small-scale projects like removing pipe insulation, technicians use sealed polyethylene bags with integrated gloves. This allows for removal without the need for full-room containment, significantly reducing site disruption.
- Encapsulation: After the bulk removal is finished, a liquid encapsulant or “lockdown” agent is applied to structural substrates. This seals any microscopic trace fibers that might remain on porous surfaces.
- Waste Disposal: All hazardous waste is double-bagged in 6-mil polyethylene bags, sealed with a gooseneck tie, and labeled according to EPA standards before being transported to a licensed landfill.
Post-Abatement Air Clearance Testing
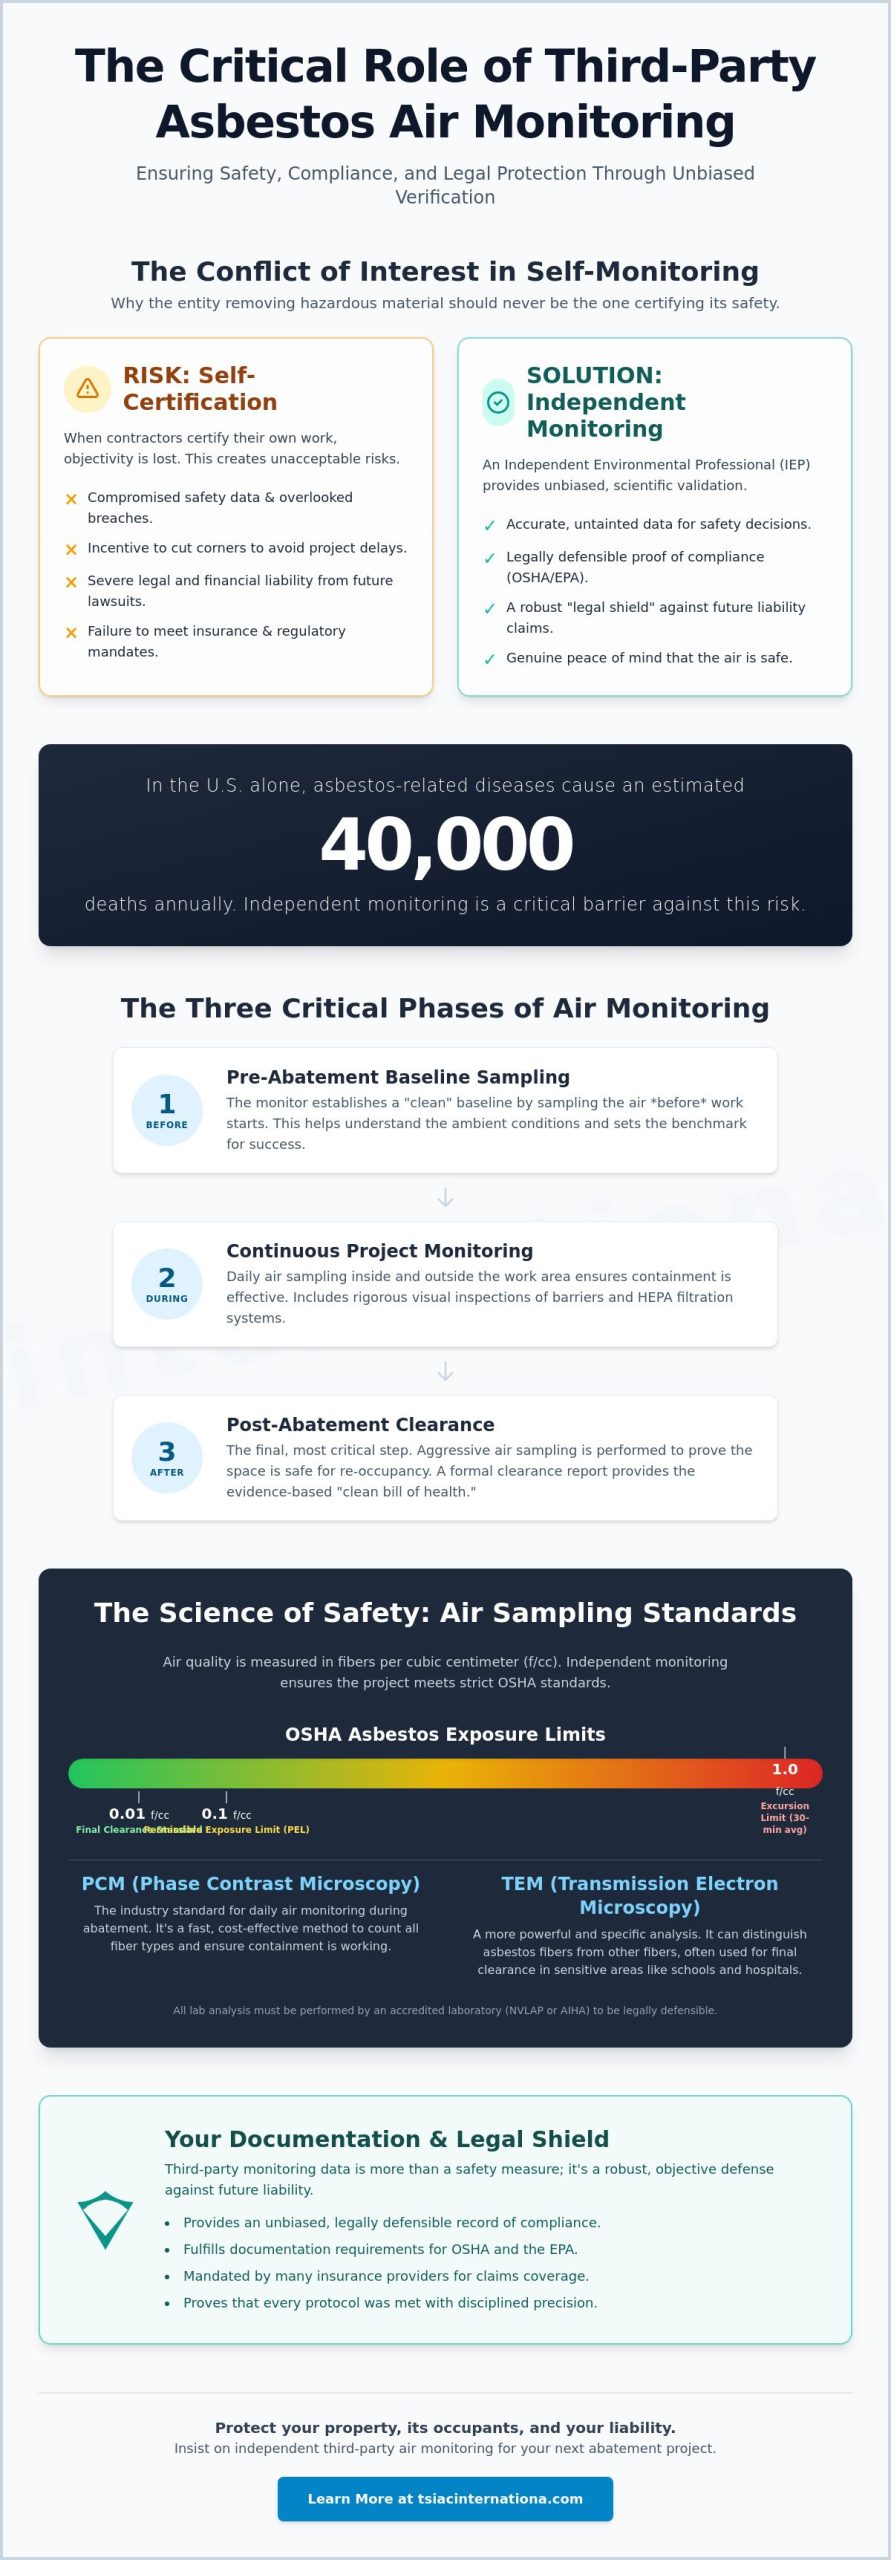
The final phase of what happens if asbestos is found during renovation involves proving the site is safe for re-entry. Federal standards require independent third-party air monitoring to avoid any conflict of interest with the abatement team. Technicians typically use Phase Contrast Microscopy (PCM) for rapid on-site results, though Transmission Electron Microscopy (TEM) is the gold standard for high-stakes environments because it can distinguish asbestos fibers from other mineral fragments. The containment remains in place until laboratory results confirm that fiber counts have dropped below the OSHA permissible exposure limit of 0.1 fibers per cubic centimeter. Only then is the “all-clear” issued, allowing the renovation to resume with full confidence in the building’s safety.
Legal Obligations and Regulatory Compliance for Property Owners
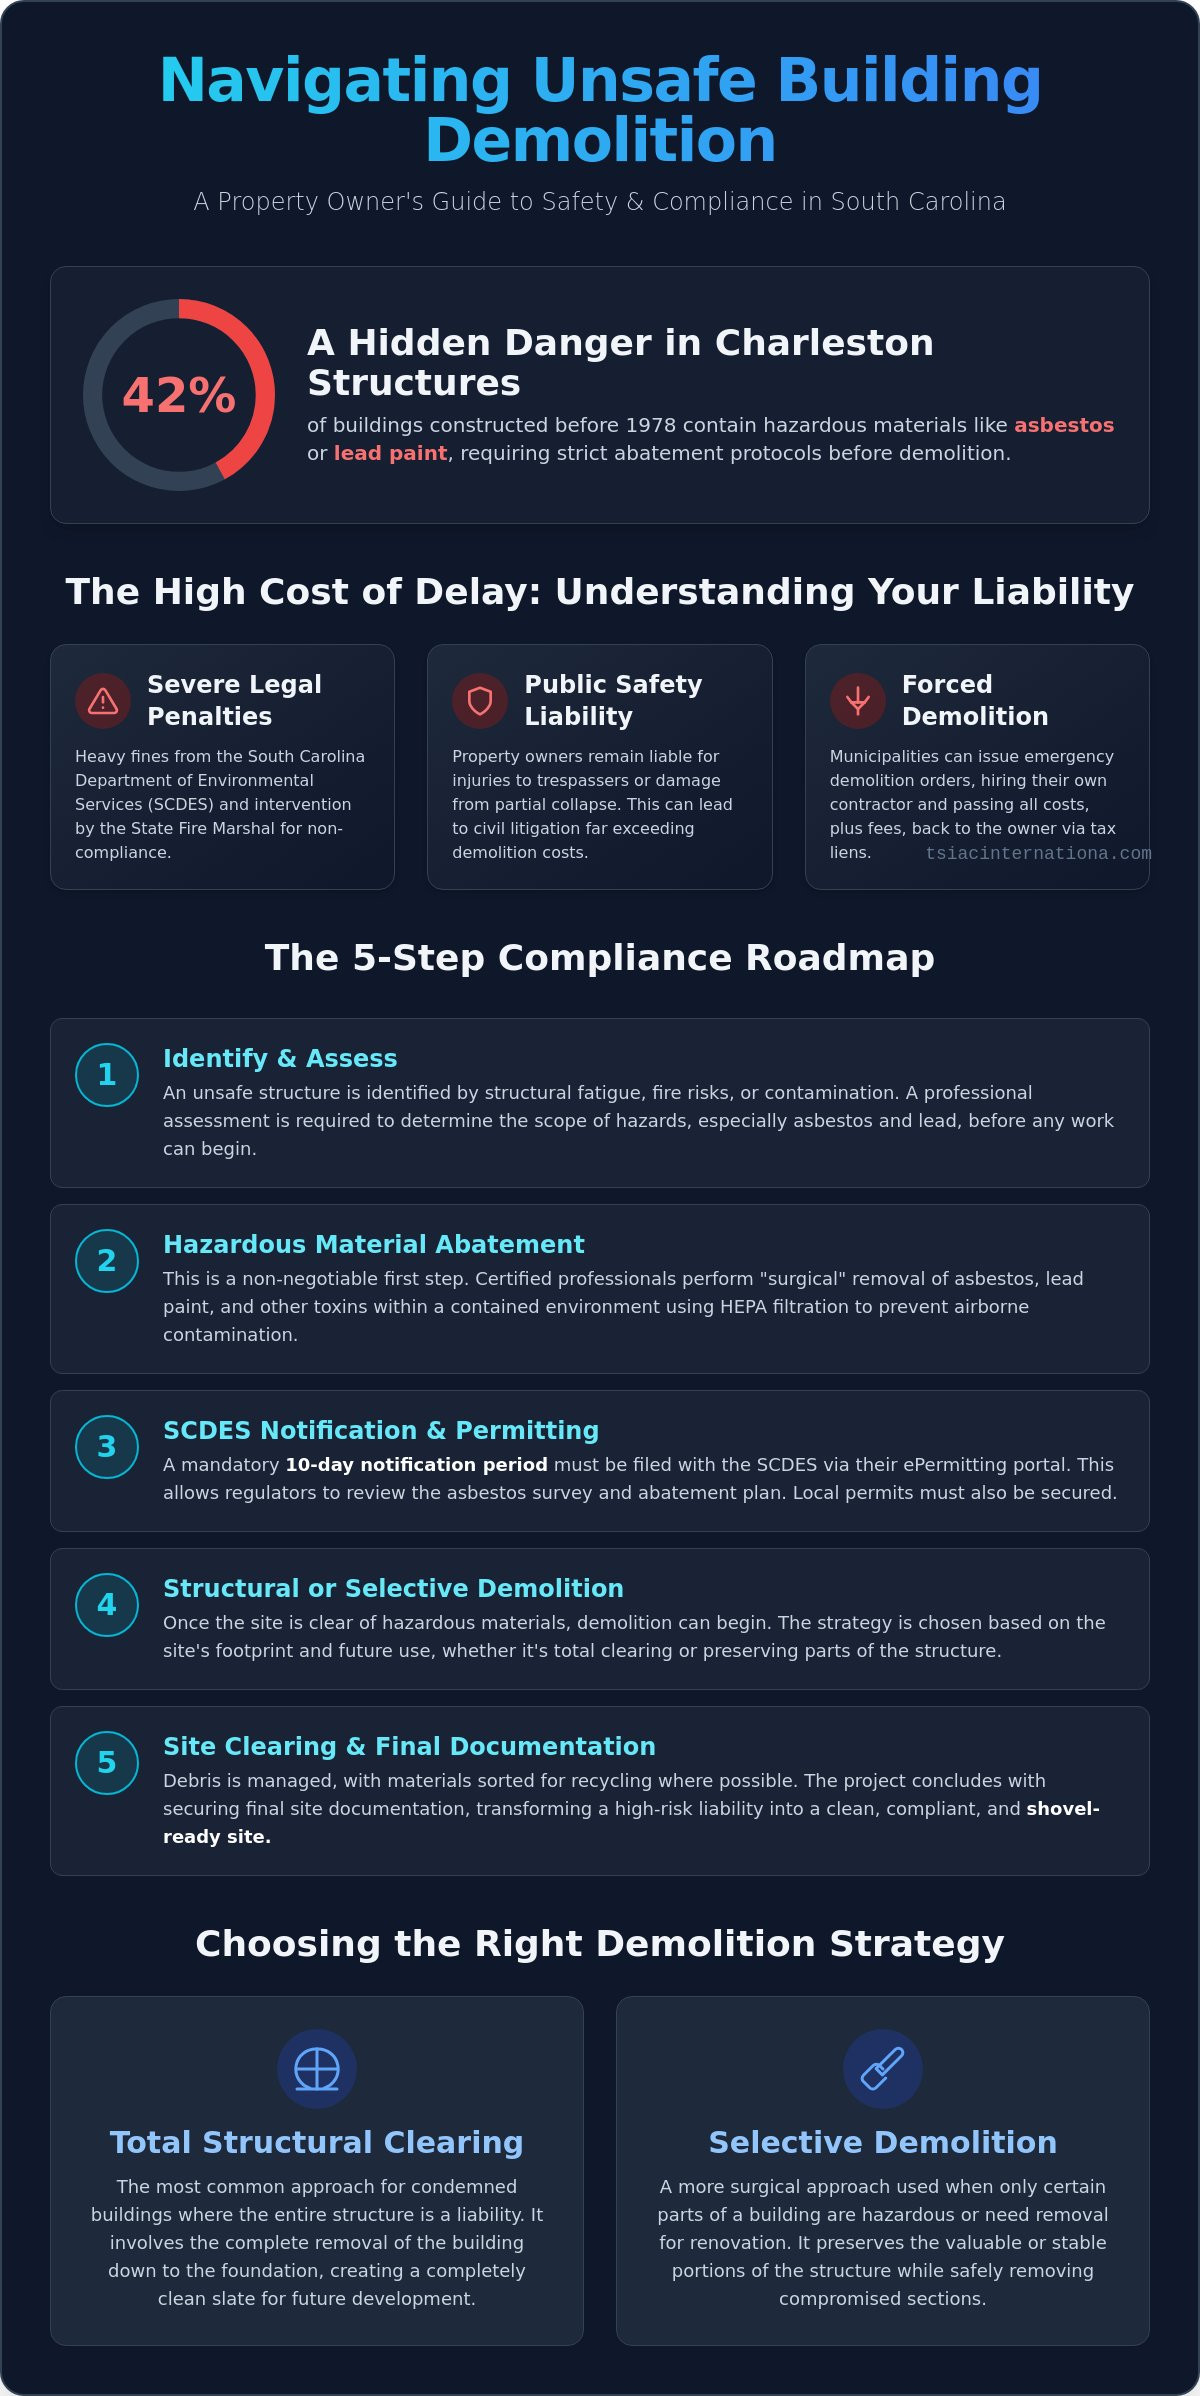
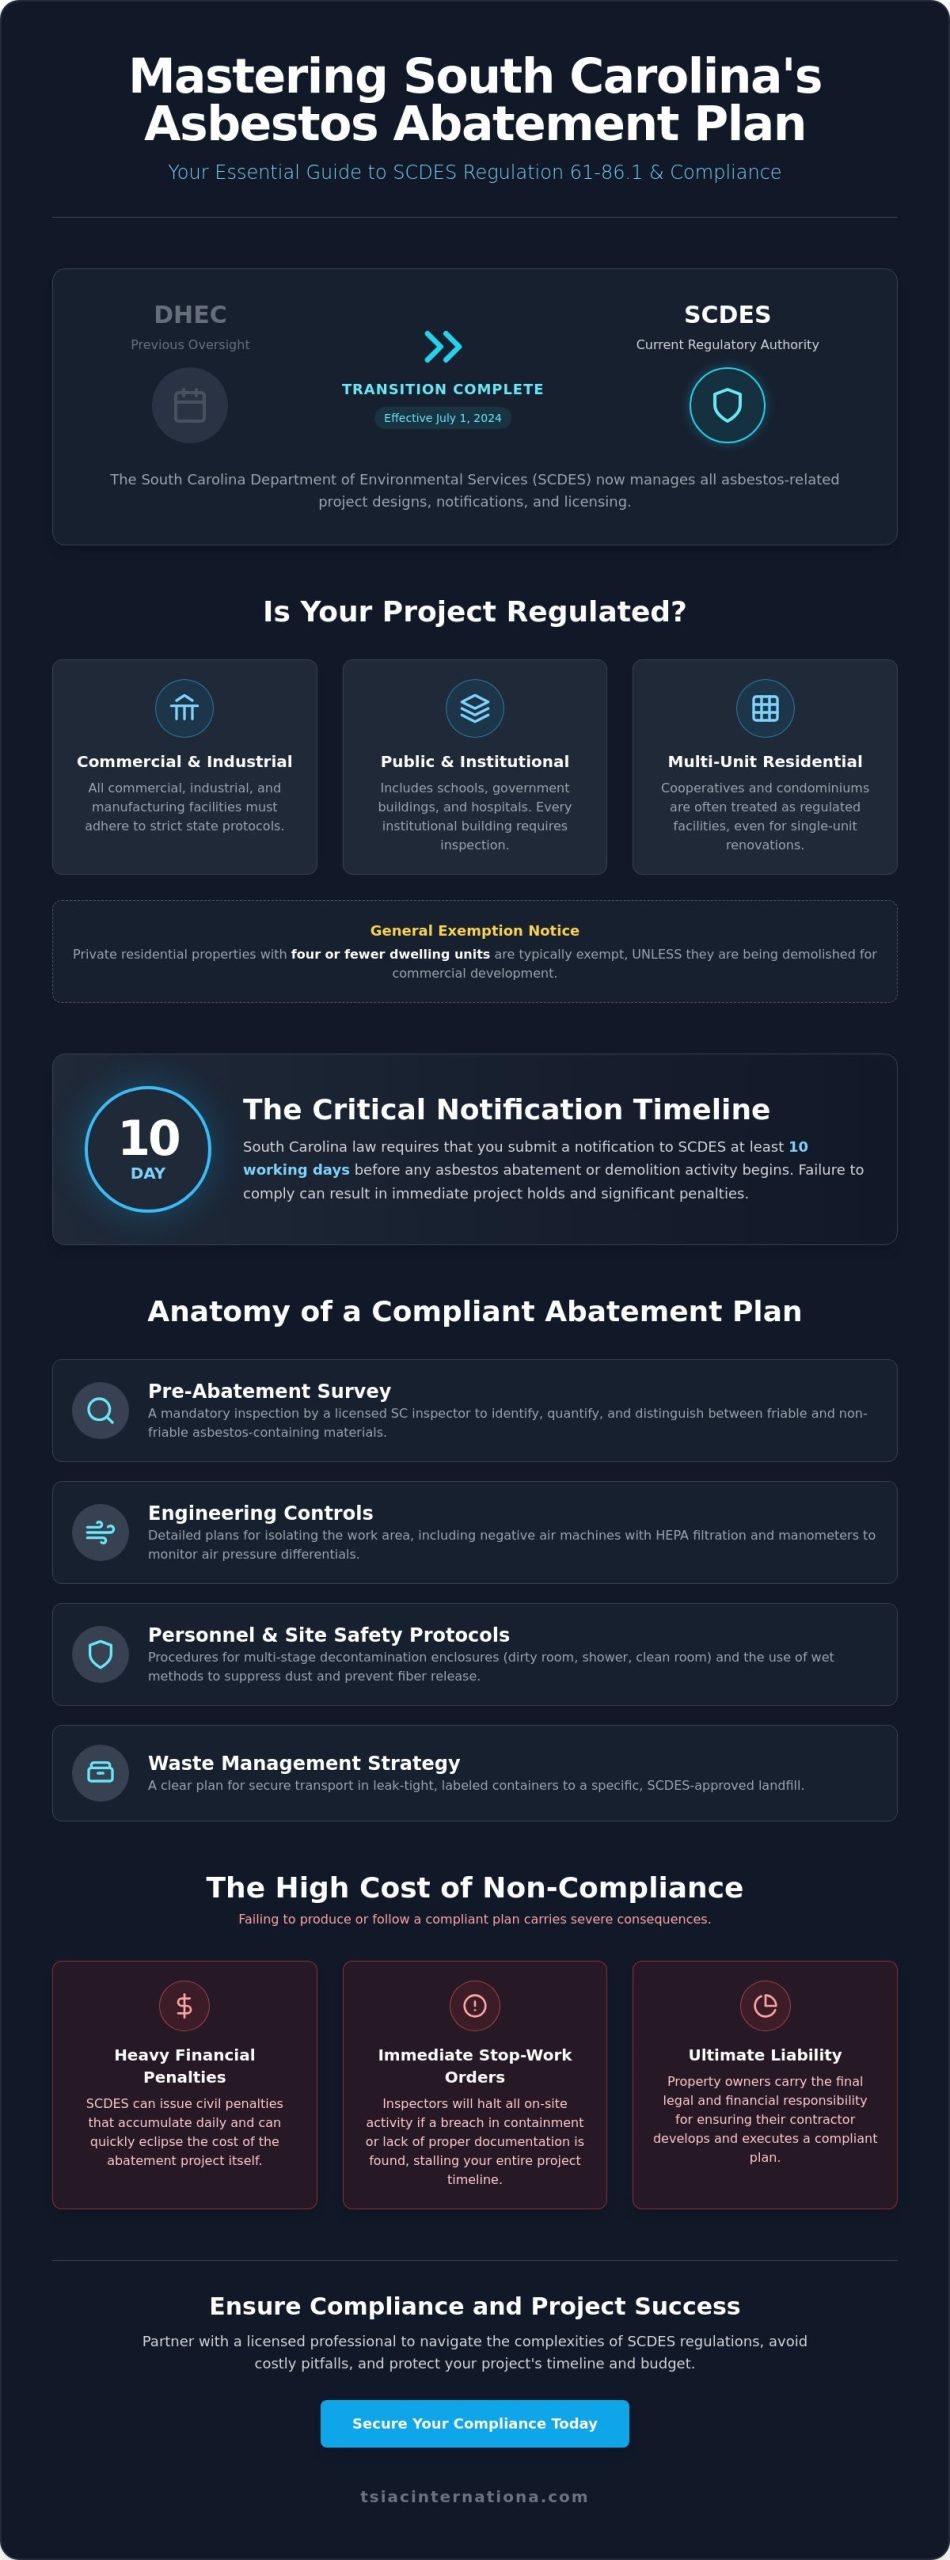
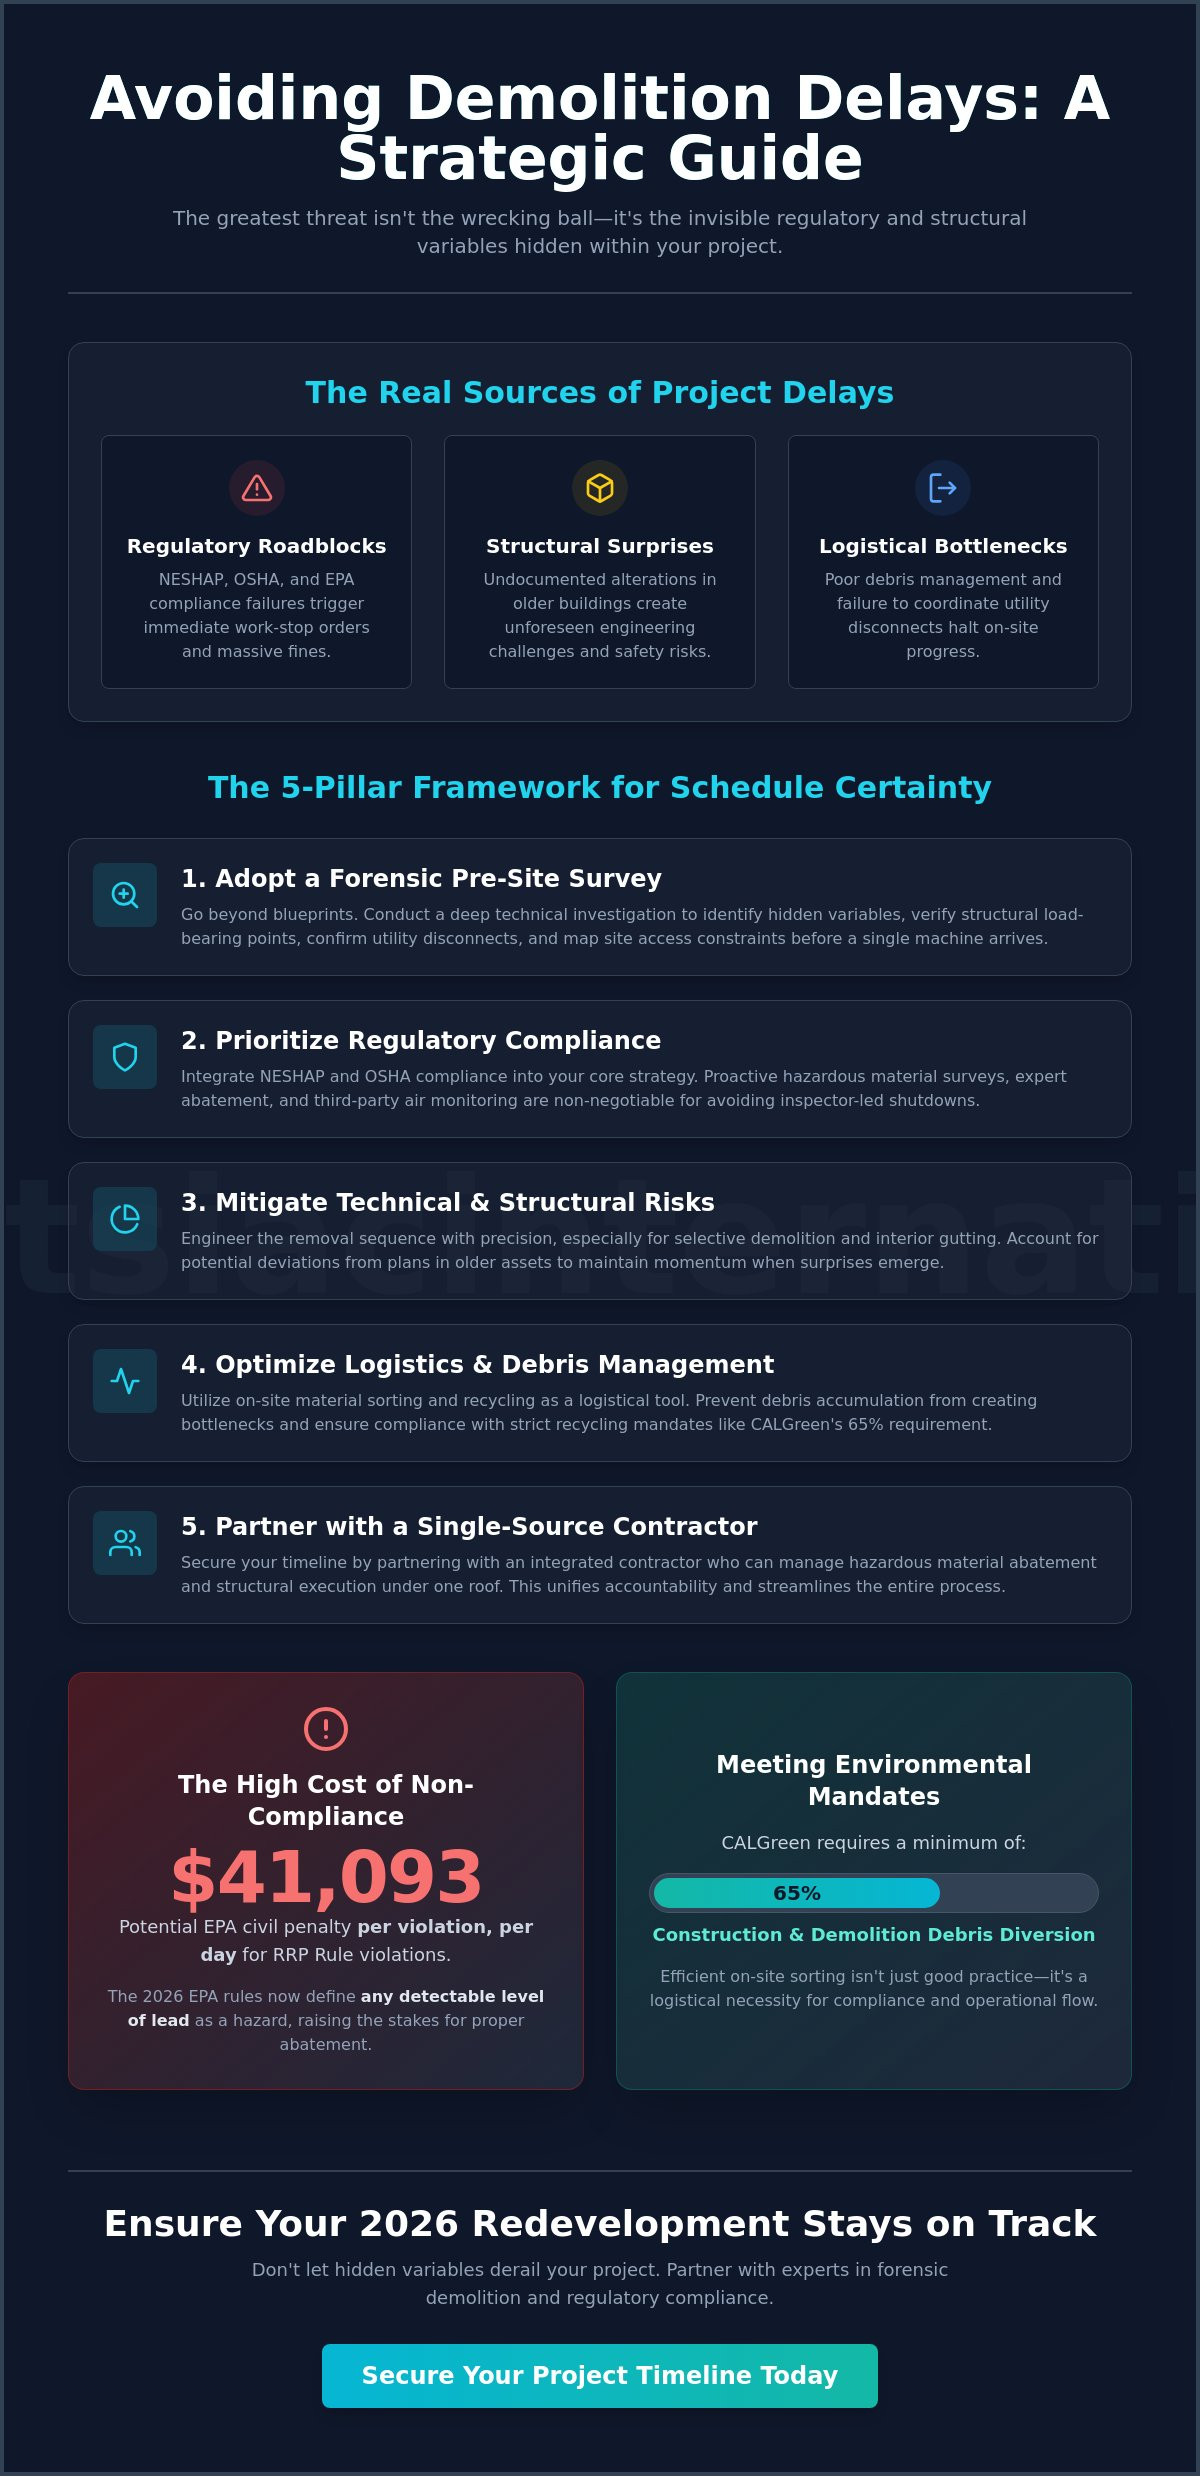
Managing a discovery of hazardous materials is as much a legal challenge as it is a technical one. Property owners must understand that the burden of compliance rests primarily on their shoulders, regardless of the contractors they hire. When considering what happens if asbestos is found during renovation, the regulatory framework is governed by two major federal entities: OSHA and the EPA. OSHA Standard 1926.1101 dictates the strict protective measures required for workers, including exposure limits and mandatory training. Simultaneously, the EPA’s National Emission Standards for Hazardous Air Pollutants (NESHAP) requires thorough inspections before any demolition or renovation activity begins. Failure to adhere to these standards can result in significant civil penalties and project shutdowns.
Liability extends beyond the physical site. Property owners have a legal duty to disclose the presence of known or suspected asbestos to any contractor or subcontractor entering the premises. If you fail to disclose this information and workers are exposed, you may face debilitating lawsuits and environmental remediation claims. Ensuring your site is managed by professionals who specialize in certified asbestos abatement is the most effective way to mitigate these risks and ensure every regulatory box is checked.
Documentation and the Chain of Custody
A successful abatement project is defined by its paper trail. You must maintain a permanent record that includes the initial inspection report, the specific abatement plan, daily air monitoring results, and the final clearance certification. These documents are vital assets during future property sales or when filing insurance claims, as they prove the hazard was handled according to law. The Waste Shipment Record is the owner’s primary defense against illegal dumping liability. This document tracks the material from the moment it leaves your site until it is accepted by a licensed landfill, providing an unbreakable chain of custody that protects you from environmental litigation.
Federal vs. Local Regulatory Frameworks
Compliance is rarely a one-size-fits-all process. While EPA standards provide a national baseline, many state and local jurisdictions have implemented even more stringent requirements. For large-scale abatement projects, most regions require a 10-day notification to regulatory agencies before work can commence. This allows inspectors the opportunity to visit the site and verify that containment measures meet local codes. Under the “Reasonable Diligence” standard, owners are expected to take proactive steps to identify hazards. Simply claiming ignorance of the material’s presence is not a valid legal defense in 2026. Understanding what happens if asbestos is found during renovation means staying ahead of these notifications and ensuring your project remains in good standing with both local and federal authorities.
Securing Your Property: Why Expert Abatement Is a Strategic Investment
Professional abatement should be viewed as a strategic investment rather than a mere project obstacle. When considering what happens if asbestos is found during renovation, the immediate focus often lands on the initial cost and potential delay. However, the long-term value of a property is directly tied to its environmental safety and structural integrity. A building with a documented history of professional remediation is significantly more attractive to future buyers, tenants, and insurers. By securing a “clean” air certificate, you provide a verified guarantee that the space is safe for occupancy, which is essential for future tenant improvements or residential conversions. This documentation acts as a permanent shield against future liability claims.
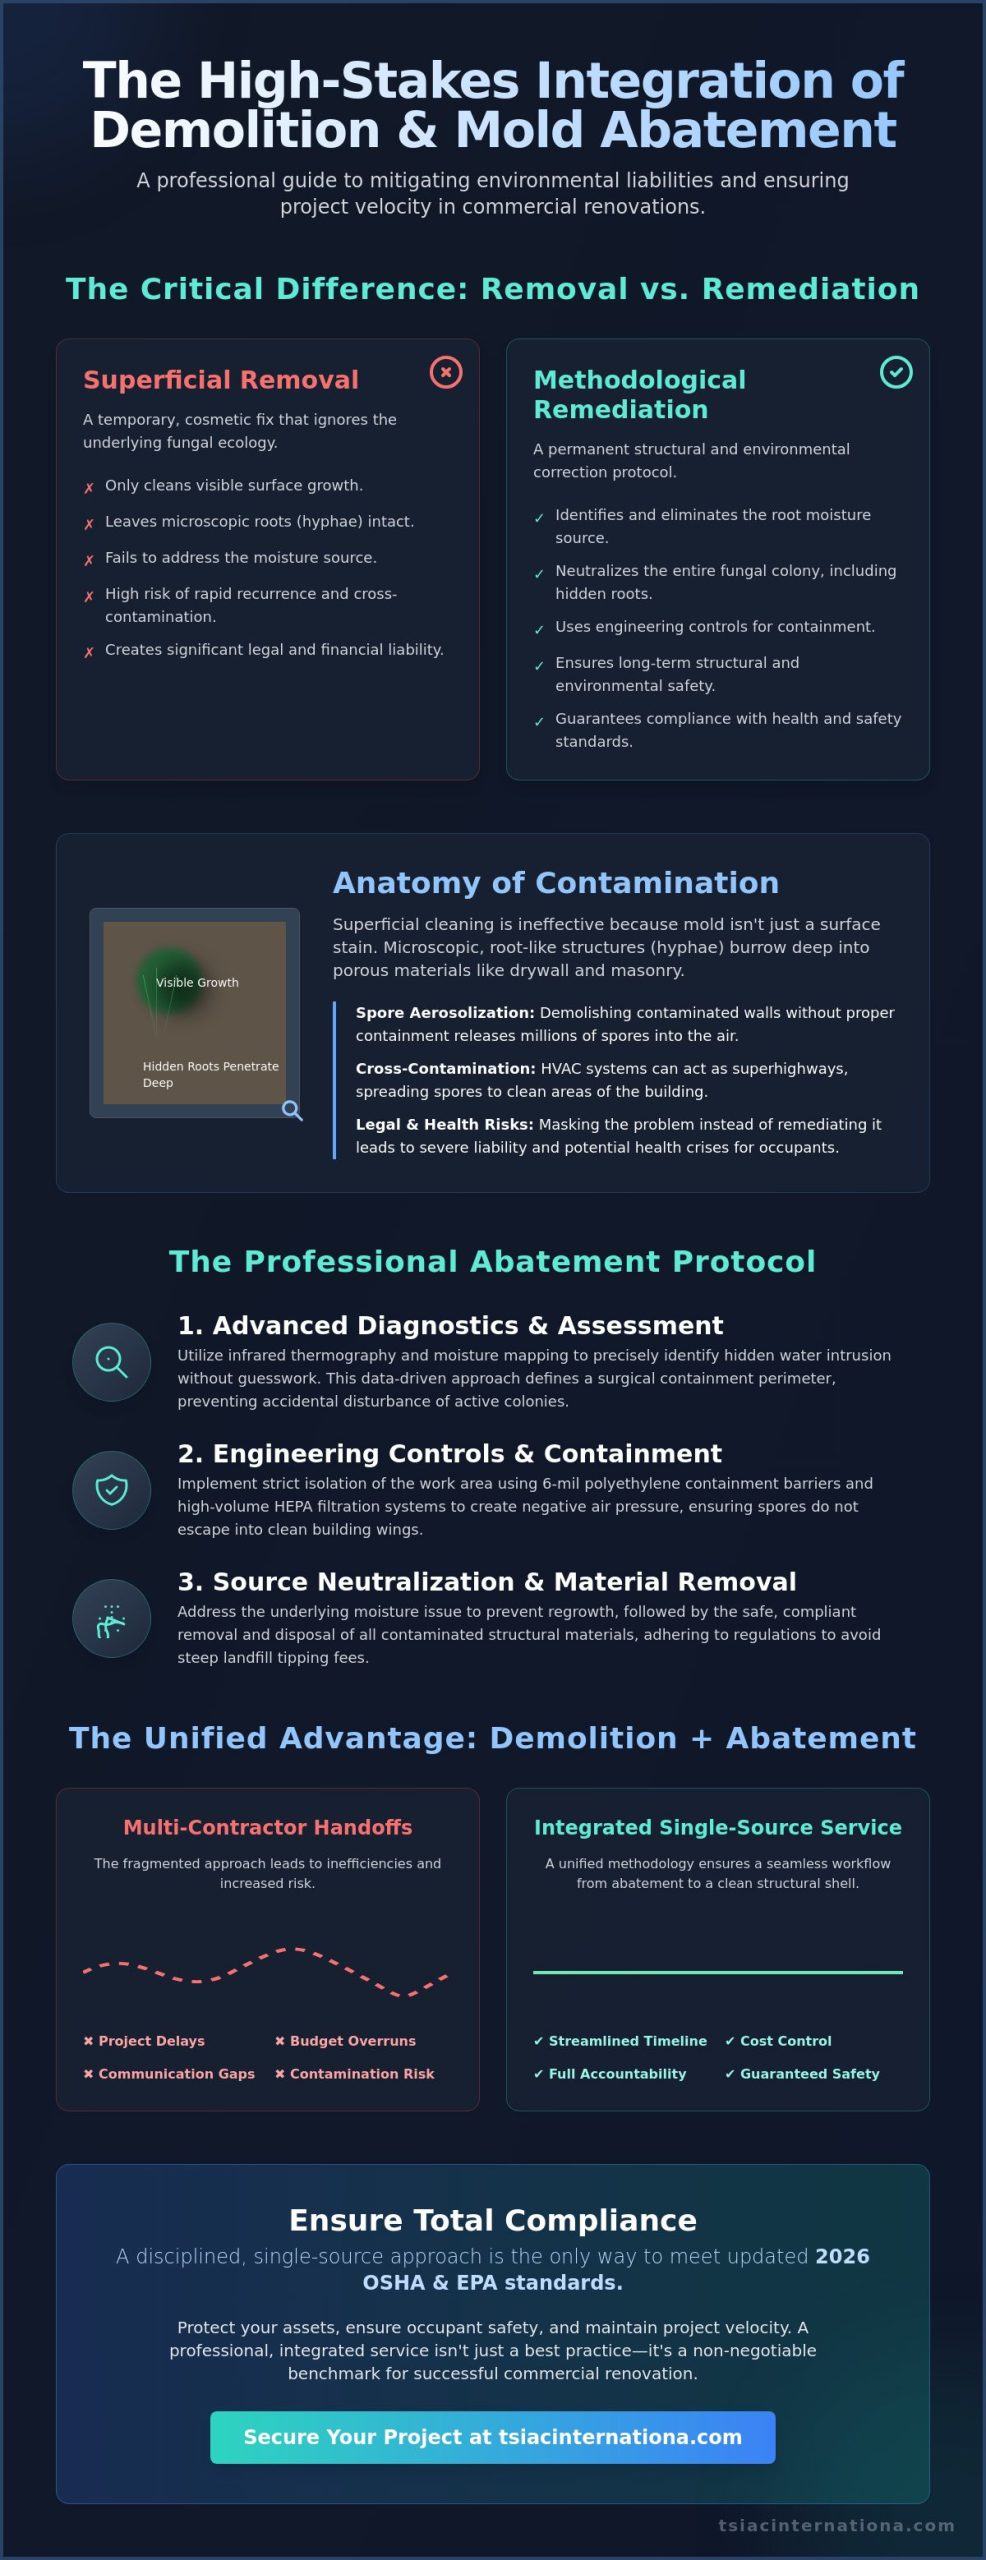
Efficiency is maximized when you integrate these environmental controls into broader commercial interior gutting services. Instead of treating abatement as a separate, isolated event, professional firms treat it as a critical phase of the demolition process. This unified approach prevents the scheduling conflicts that arise when multiple contractors must coordinate access to a restricted site. TSIAC International leverages over 15 years of field experience to manage these complex hazardous material projects. We ensure that safety protocols never compromise the overall project momentum, allowing for a seamless transition from remediation to the next phase of construction. Dealing with the reality of what happens if asbestos is found during renovation requires this level of operational foresight.
Evaluating Abatement Contractor Credentials
Selecting a partner requires a deep dive into their specific asbestos licenses, bonding, and environmental liability insurance. You should prioritize firms that offer a comprehensive suite of hazardous material abatement services, including lead and mold remediation. A contractor with a documented commitment to job site safety and environmental recycling provides a layer of protection that a low-bid, single-service provider cannot match. This expertise ensures that all materials are handled according to 2026 standards, protecting both the workers and the property’s future inhabitants.
Integrating Abatement into Your Renovation Timeline
Professional firms minimize downtime through selective demolition and surgical removal techniques. By working with a single-source contractor for both structural demolition and hazardous remediation, you eliminate the communication gaps that lead to budget overruns. This integration allows for a more fluid schedule where abatement and selective demolition occur in a logical, safe sequence. If you’re currently facing a discovery or planning a project in an older structure, Contact TSIAC International for a comprehensive structural assessment and abatement plan that keeps your project compliant and on schedule.
Navigating Your Renovation with Professional Certainty
Encountering hazardous materials doesn’t have to derail your project’s long-term success. By prioritizing immediate containment and adhering to 2026 regulatory standards, you protect both your workers and your property’s future market value. You now understand the full scope of what happens if asbestos is found during renovation, from the initial stop-work order to the final air clearance testing. These steps are essential for maintaining a safe, legally compliant construction site that stands up to federal scrutiny and preserves structural integrity.
Managing these risks requires a partner with deep technical proficiency and methodical precision. With over 15 years of demolition and abatement expertise, TSIAC International provides the disciplined approach necessary for complex hazardous material projects. We are fully licensed and insured specialists who excel in both selective demolition and total structural removal. Secure your project with professional asbestos abatement from TSIAC International to ensure your renovation proceeds with absolute safety. Your property’s value and safety are in expert hands.
Frequently Asked Questions
Is it illegal to remove asbestos myself during a home renovation?
DIY removal isn’t federally illegal for single-family homeowners in their primary residence, but it is strongly discouraged due to extreme health risks. Many local jurisdictions and state agencies have implemented stricter bans or require specific permits that effectively mandate professional intervention. In any commercial or multi-unit residential setting, performing your own abatement is a direct violation of EPA and OSHA regulations.
How long does the professional asbestos abatement process usually take?
A standard abatement project typically requires between two and five days to complete, depending on the volume of material and the complexity of the containment. This timeline includes the setup of negative pressure enclosures, the surgical removal of the material, and the mandatory waiting period for post-abatement air clearance results. Larger structural projects or complex commercial gutting can extend this timeframe significantly.
What does asbestos look like when it is uncovered behind a wall?
Asbestos rarely has a uniform appearance, making visual identification unreliable. It often appears as gray or white “fluffy” insulation, corrugated paper wrapping on pipes, or brittle white tape on ductwork. In many cases, it’s embedded within other materials like joint compound or floor tile adhesive, where it remains invisible to the naked eye until it’s disturbed.
Can I stay in my home while asbestos removal is being performed?
You shouldn’t remain in the immediate vicinity of the work zone, and most professionals recommend vacating the property entirely during large-scale removals. While negative pressure enclosures are designed to isolate the contaminated air, the risk of accidental breach or cross-contamination makes residential occupancy a safety liability. Occupants are typically cleared to return only after a third-party inspector issues an air clearance certificate.
How much does professional asbestos removal cost for a standard renovation?
Industry data from 2026 indicates that the national average for asbestos removal ranges from $1,200 to $3,300 for a single project. Costs are influenced by the material’s friability, the accessibility of the location, and local disposal fees at licensed landfills. It’s important to remember that these figures represent industry averages and not specific service quotes, as each structural environment presents unique technical challenges.
What happens if my contractor accidentally disturbed asbestos without knowing?
If a contractor accidentally disturbs suspicious material, you must immediately cease all activity and evacuate the area to prevent further fiber migration. This is precisely what happens if asbestos is found during renovation when protocols aren’t established beforehand. You’ll need to hire an industrial hygienist to perform air and surface sampling to determine the extent of the contamination before a professional abatement team can begin the cleanup process.
Do I need to test for asbestos if my building was built after 1980?
Yes, testing is still a regulatory requirement because the 1989 EPA ban was partially overturned, allowing many asbestos-containing products to remain on the market. Buildings constructed throughout the 1980s and 1990s frequently contain asbestos in floor tiles, roofing materials, and mastics. Relying on the age of the building alone is not a valid substitute for a professional hazardous material survey.
What is the difference between air testing and bulk material testing?
Bulk material testing involves taking a physical sample of a substance to determine its asbestos content by weight. In contrast, air testing measures the concentration of airborne fibers within a specific volume of air, usually after a disturbance or following abatement. Both are necessary; bulk testing identifies the hazard, while air testing verifies that the environment is safe for re-entry.