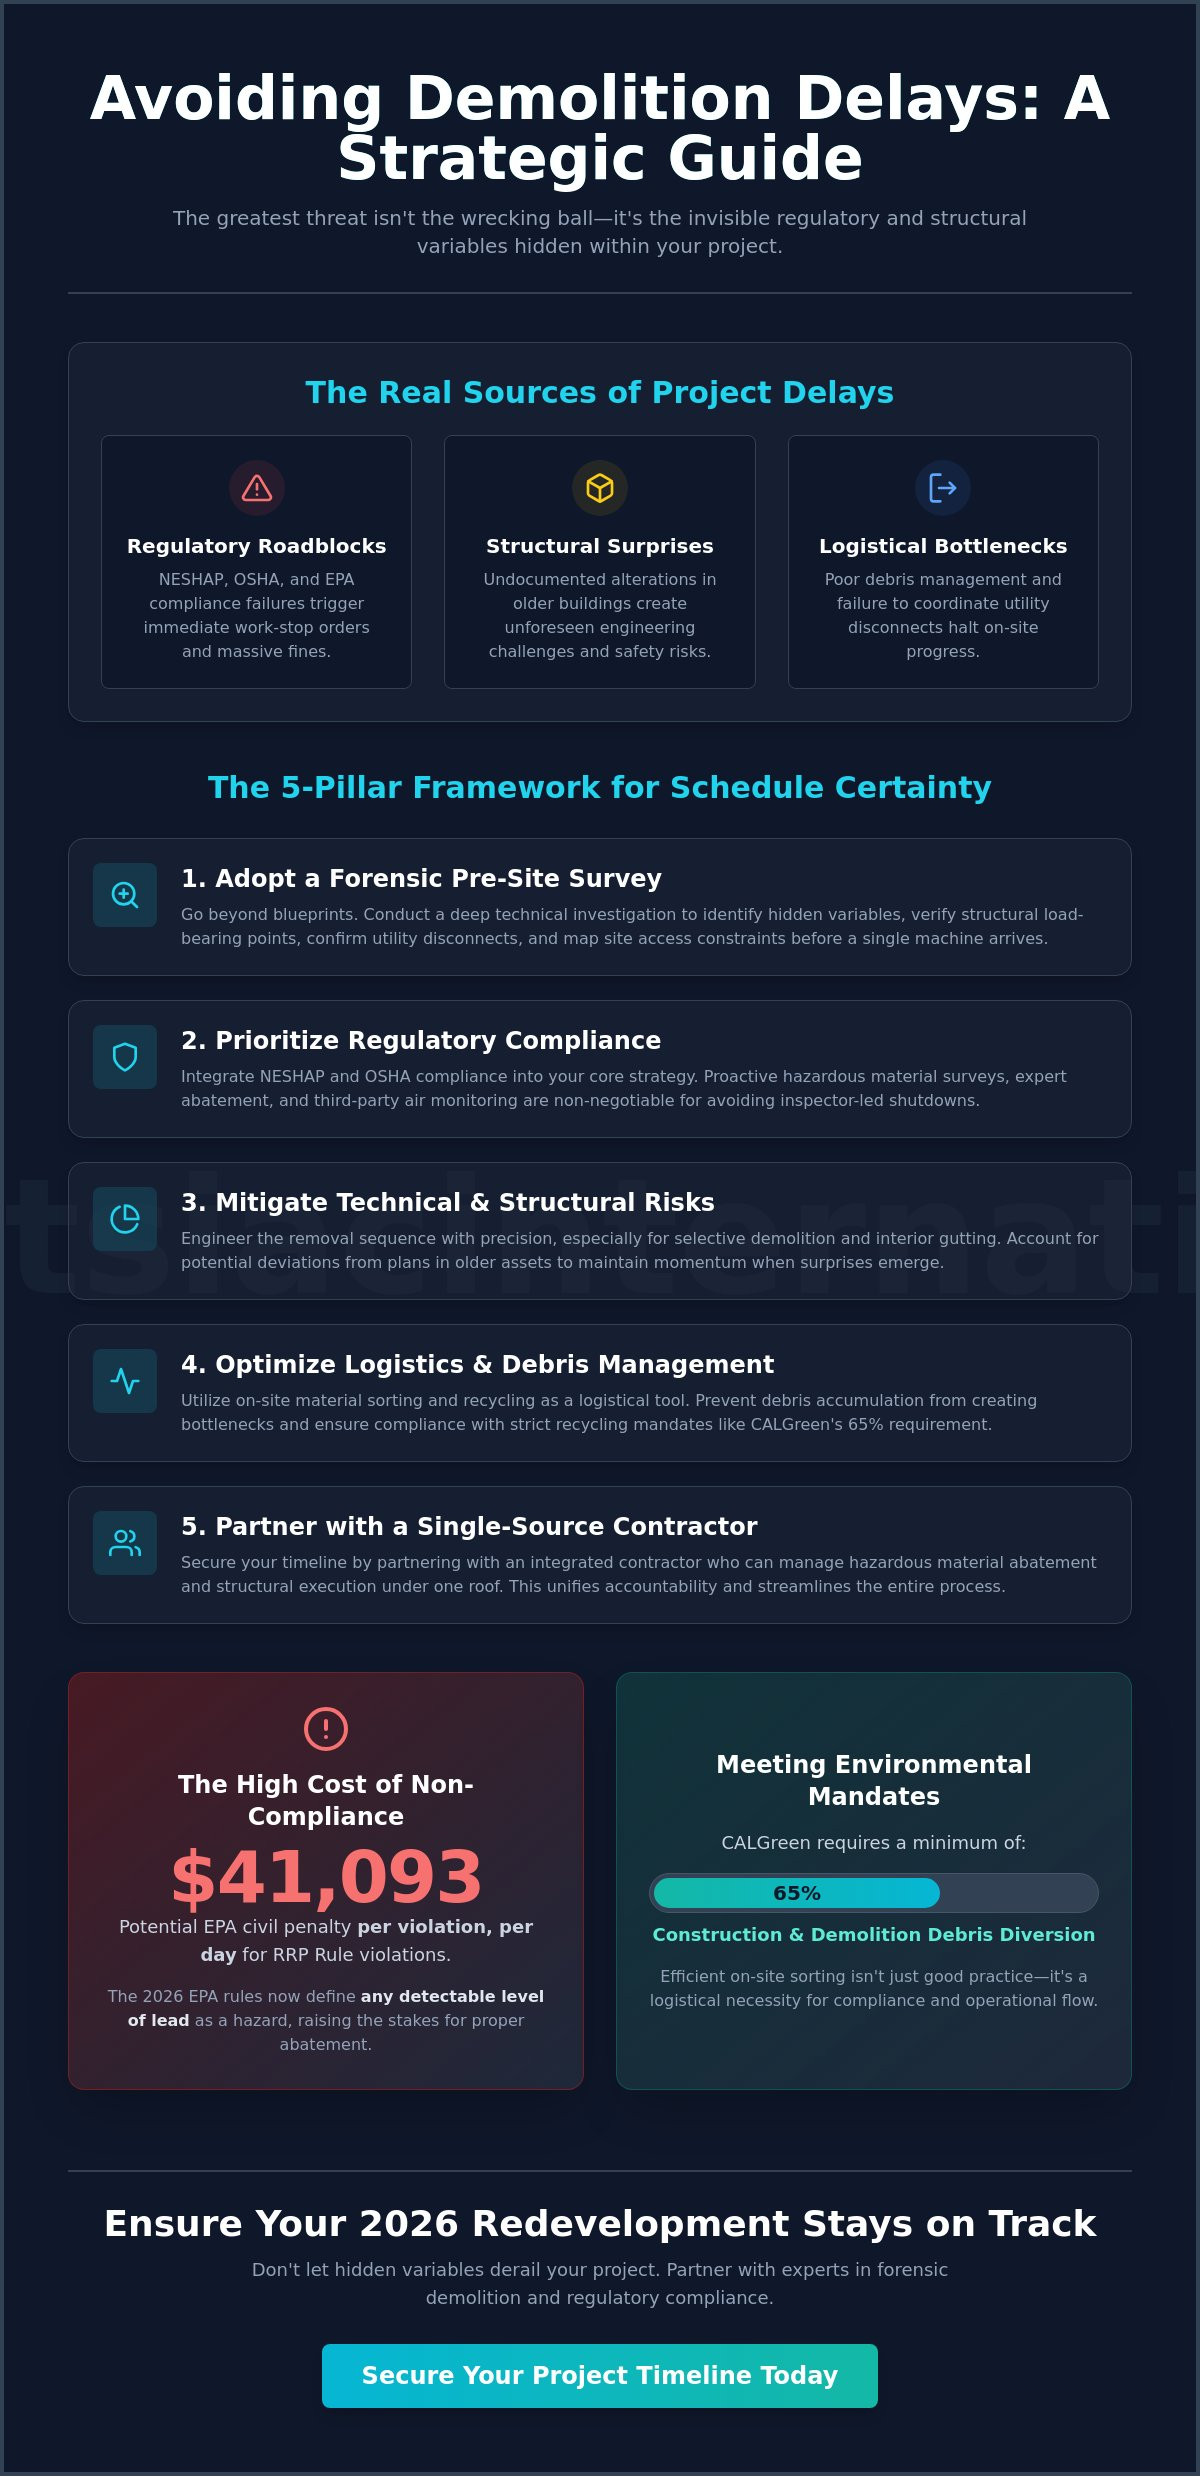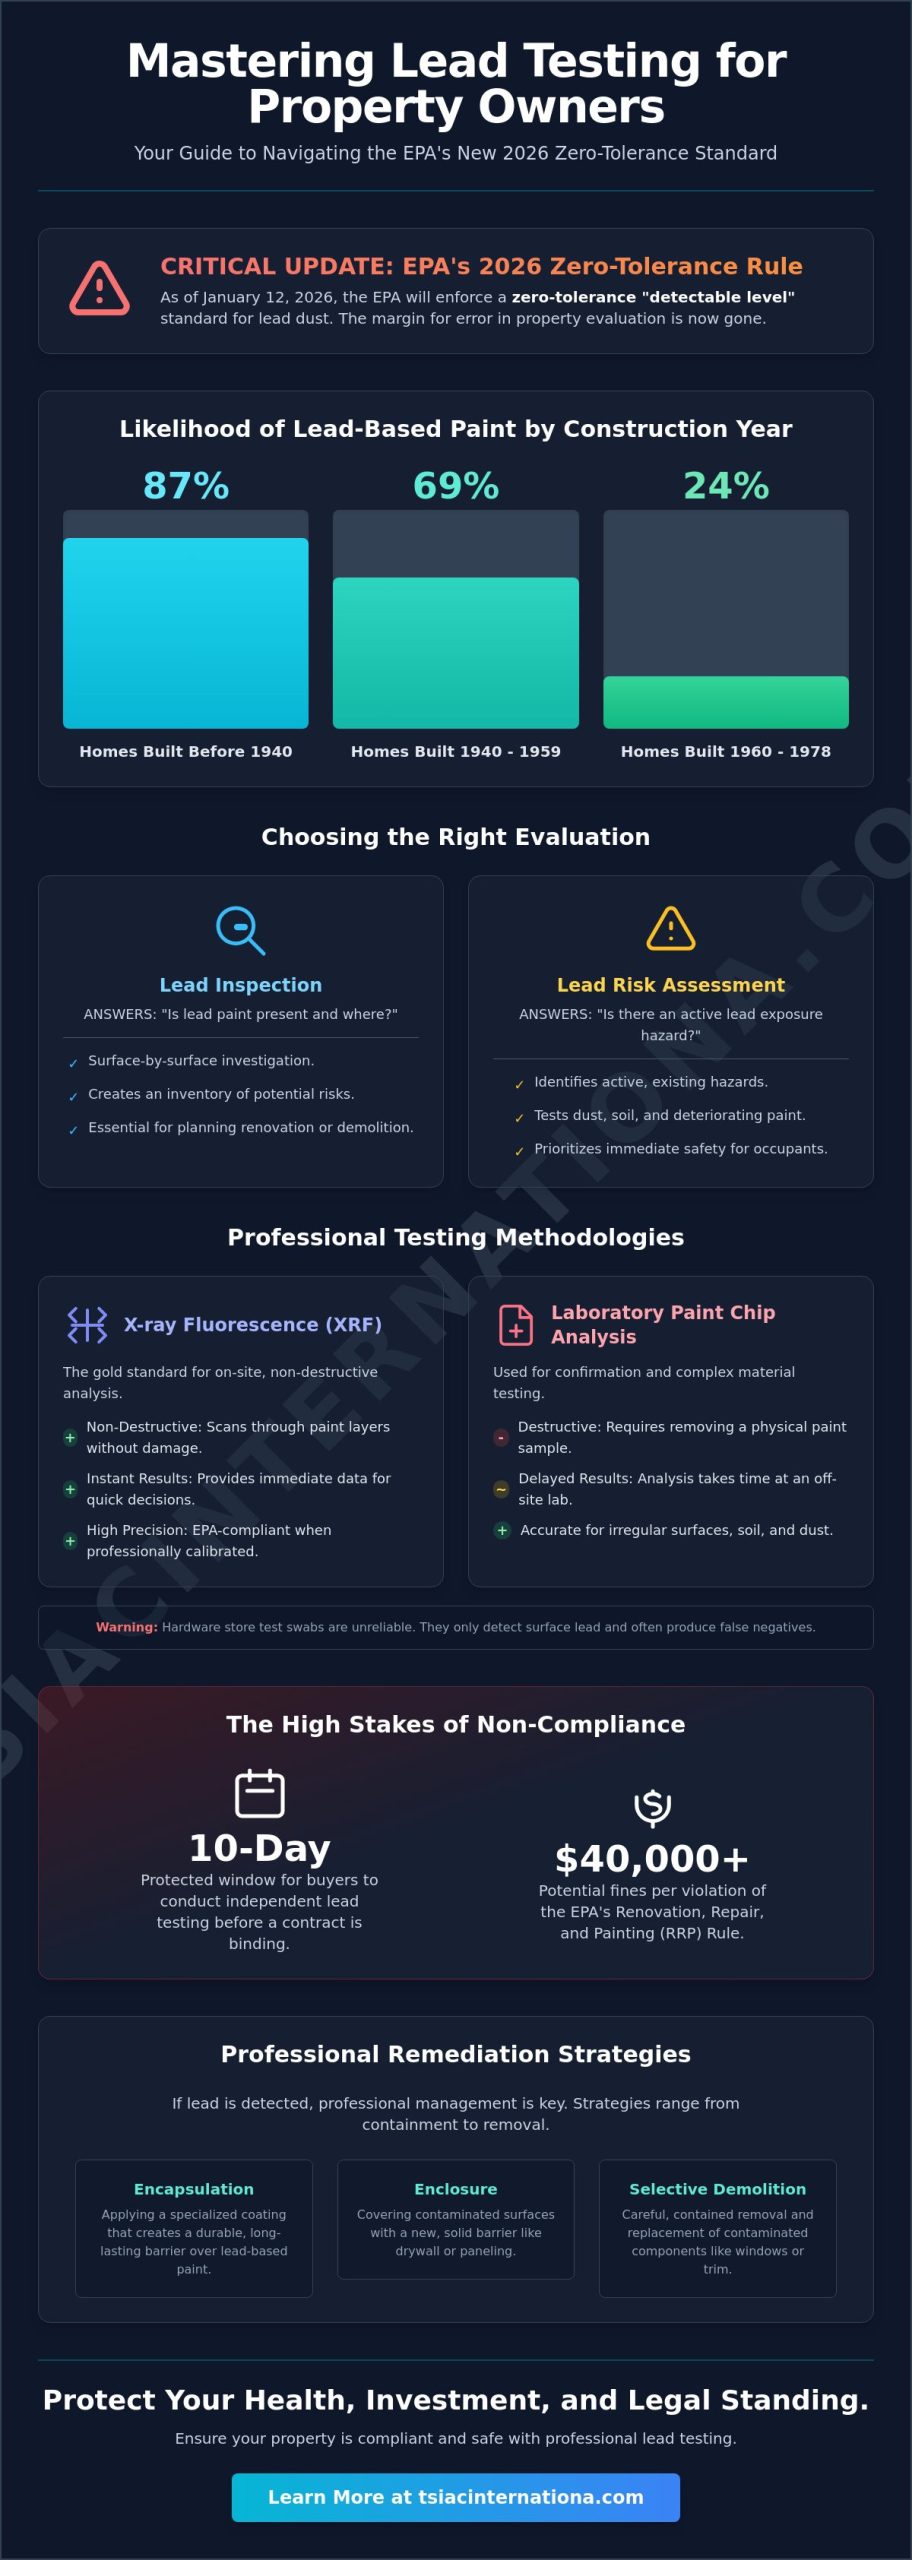
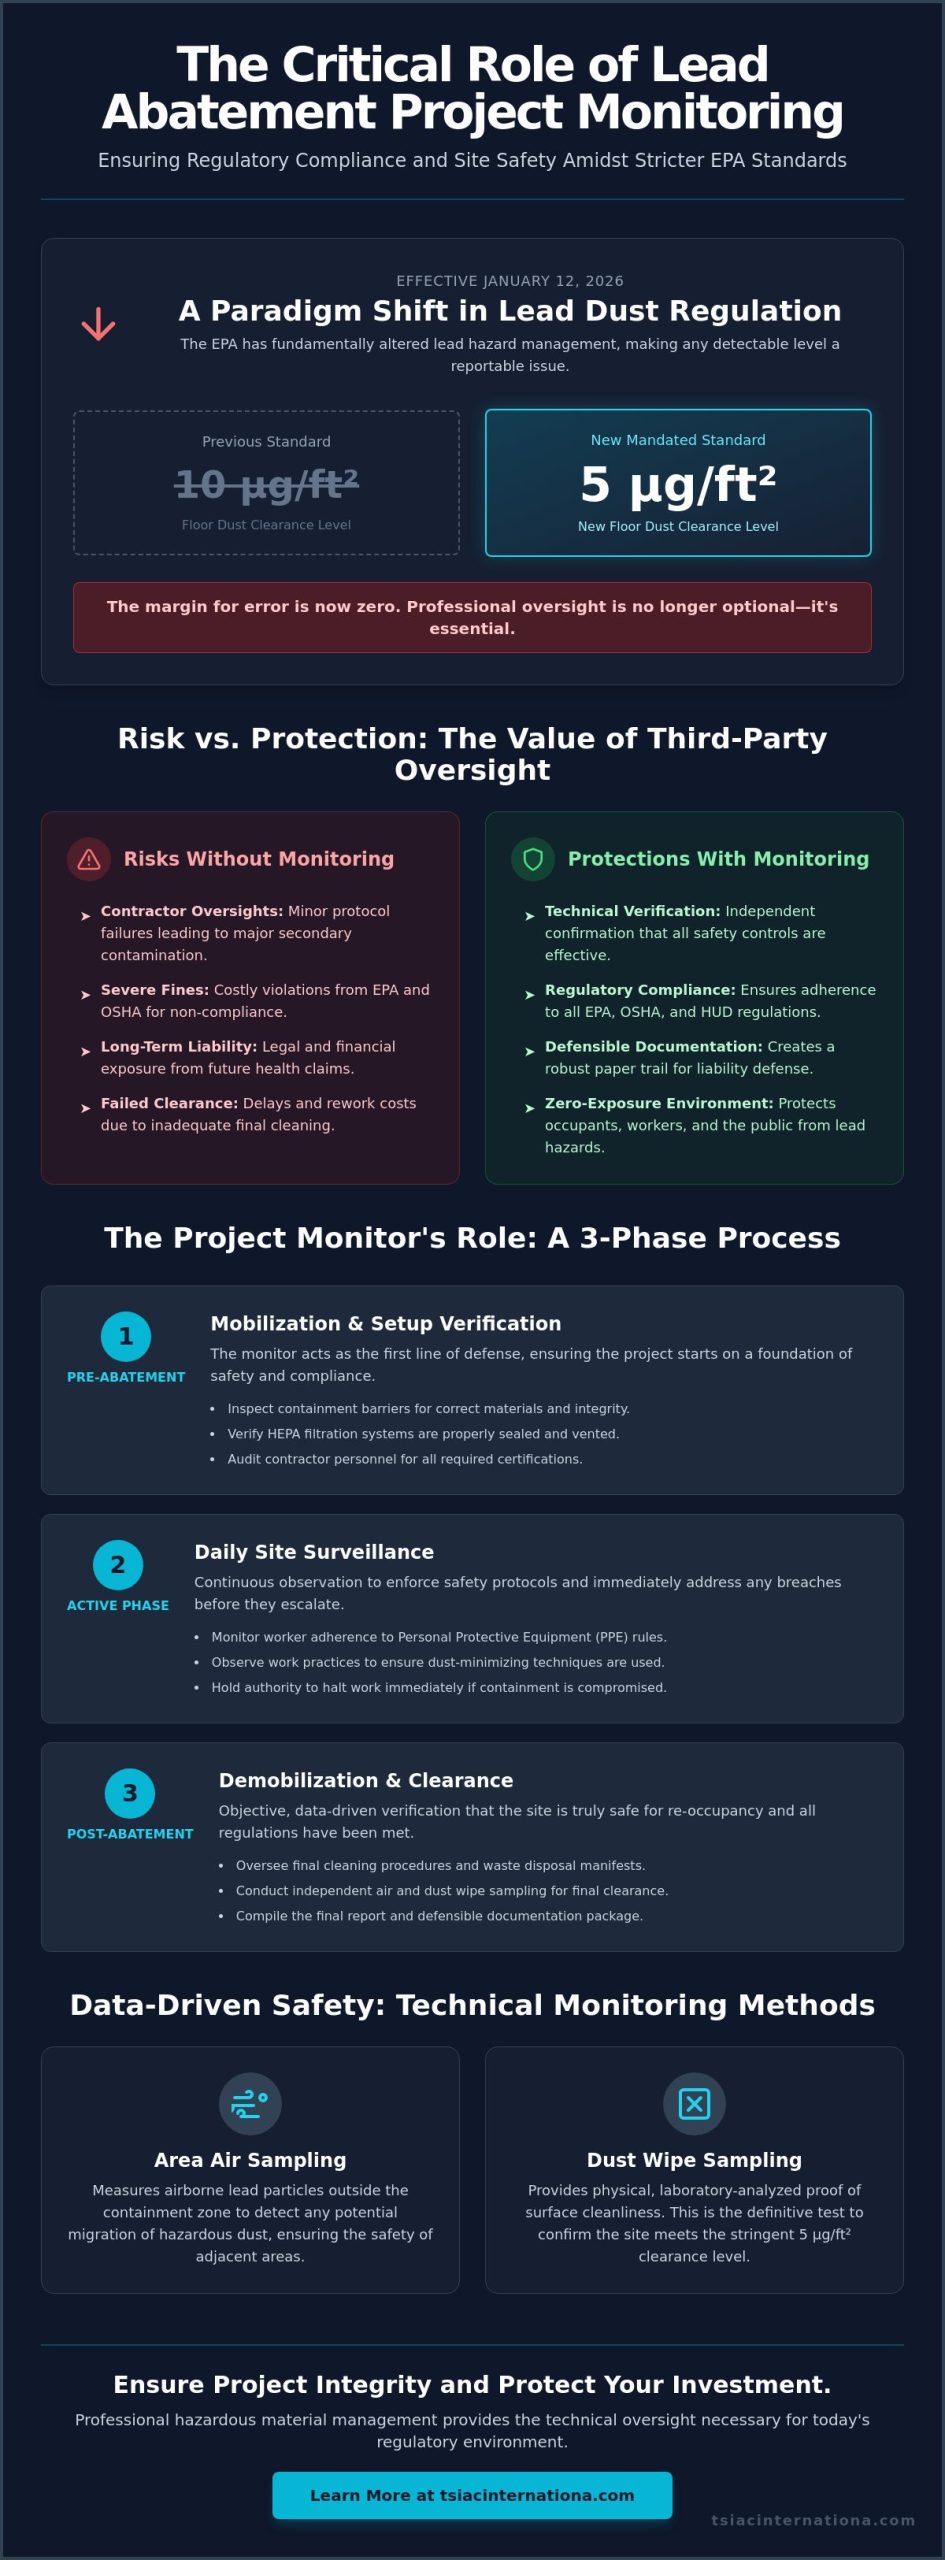
As of January 12, 2026, the EPA has fundamentally shifted the regulatory landscape by classifying any detectable level of lead dust on floors or windowsills as a reportable hazard. For property owners, this means the margin for error during remediation has effectively vanished, making lead abatement project monitoring a critical component of any renovation strategy. It’s natural to feel concerned that a contractor might miss a protocol or cause secondary contamination, potentially leading to severe OSHA fines or long-term liability. Relying solely on the firm performing the removal can leave your organization vulnerable to technical oversights that are difficult to detect without specialized oversight.
This guide explains how professional project monitoring serves as an essential layer of protection for your property and stakeholders. You’ll learn how independent technical verification ensures full regulatory compliance, maintains zero-exposure environments, and provides the rigorous documentation needed for liability defense. We will explore the impact of the new 5 µg/ft² floor clearance standards and explain how methodical oversight bridges the gap between basic removal and true site safety.
Key Takeaways
- Understand why independent lead abatement project monitoring is the primary safeguard against the technical failures and regulatory violations that lead to severe EPA fines.
- Learn the specific protocols for area air sampling and dust wipe testing that verify your site remains free of hazardous lead dust during and after the removal process.
- Discover how a certified project monitor creates a defensible documentation trail, protecting property owners from long-term legal and financial liability.
- Identify the critical daily surveillance tasks, from verifying HEPA filtration to enforcing strict PPE compliance, that ensure contractor adherence to safety standards.
- Recognize the importance of professional oversight in complex hazardous material management to ensure projects are executed with methodical precision and zero exposure incidents.
What is Lead Abatement Project Monitoring?
Lead abatement project monitoring is the systematic, technical oversight of lead-based paint removal activities by an independent, certified third party. This function serves as a critical audit layer that separates the execution of the work from its safety verification. While an abatement contractor is responsible for the physical removal or encapsulation of hazardous materials, the project monitor ensures every action aligns with stringent safety protocols. For a foundational understanding of these processes, this Lead abatement overview details the methods used to manage lead hazards in various environments.
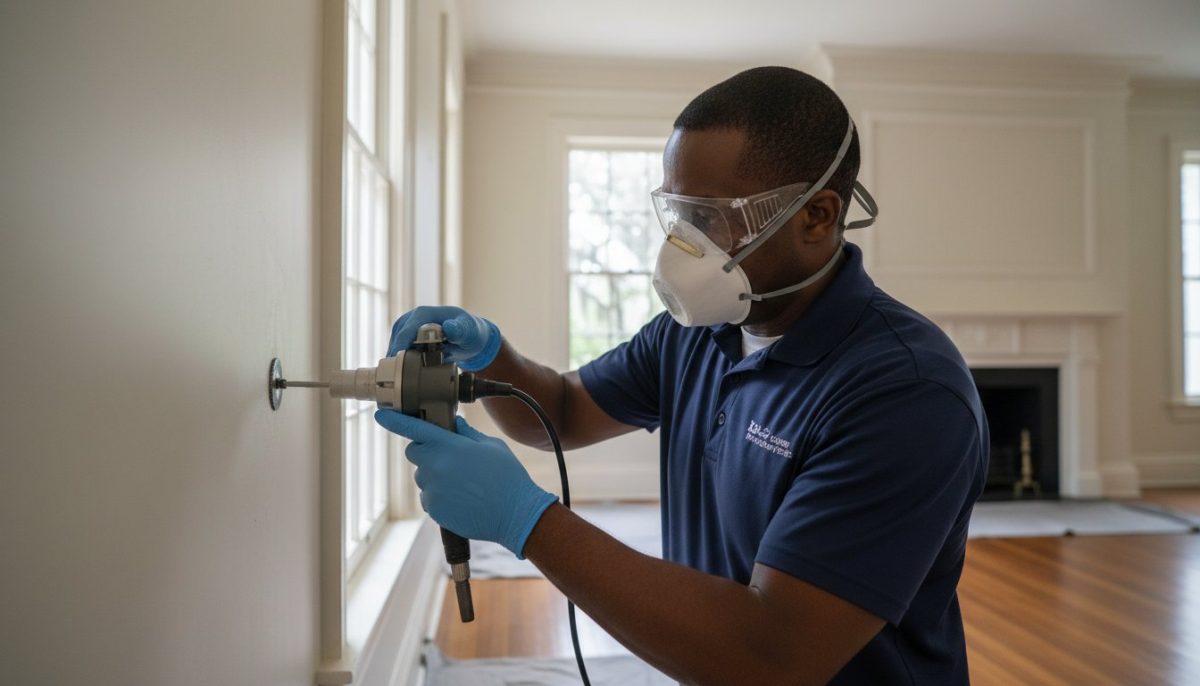
The core objective of lead abatement project monitoring is the total containment of lead-contaminated dust and debris. Because lead particles are microscopic and highly mobile, even minor breaches in containment can lead to secondary contamination of an entire facility. The project monitor provides a fact-based assessment of site conditions, verifying that engineering controls like HEPA filtration and negative pressure systems are functioning at peak efficiency. This oversight is not merely a suggestion; it’s a methodical approach to risk management that protects property owners from the catastrophic failures that occur when safety is left to chance.
The Regulatory Framework: EPA and OSHA
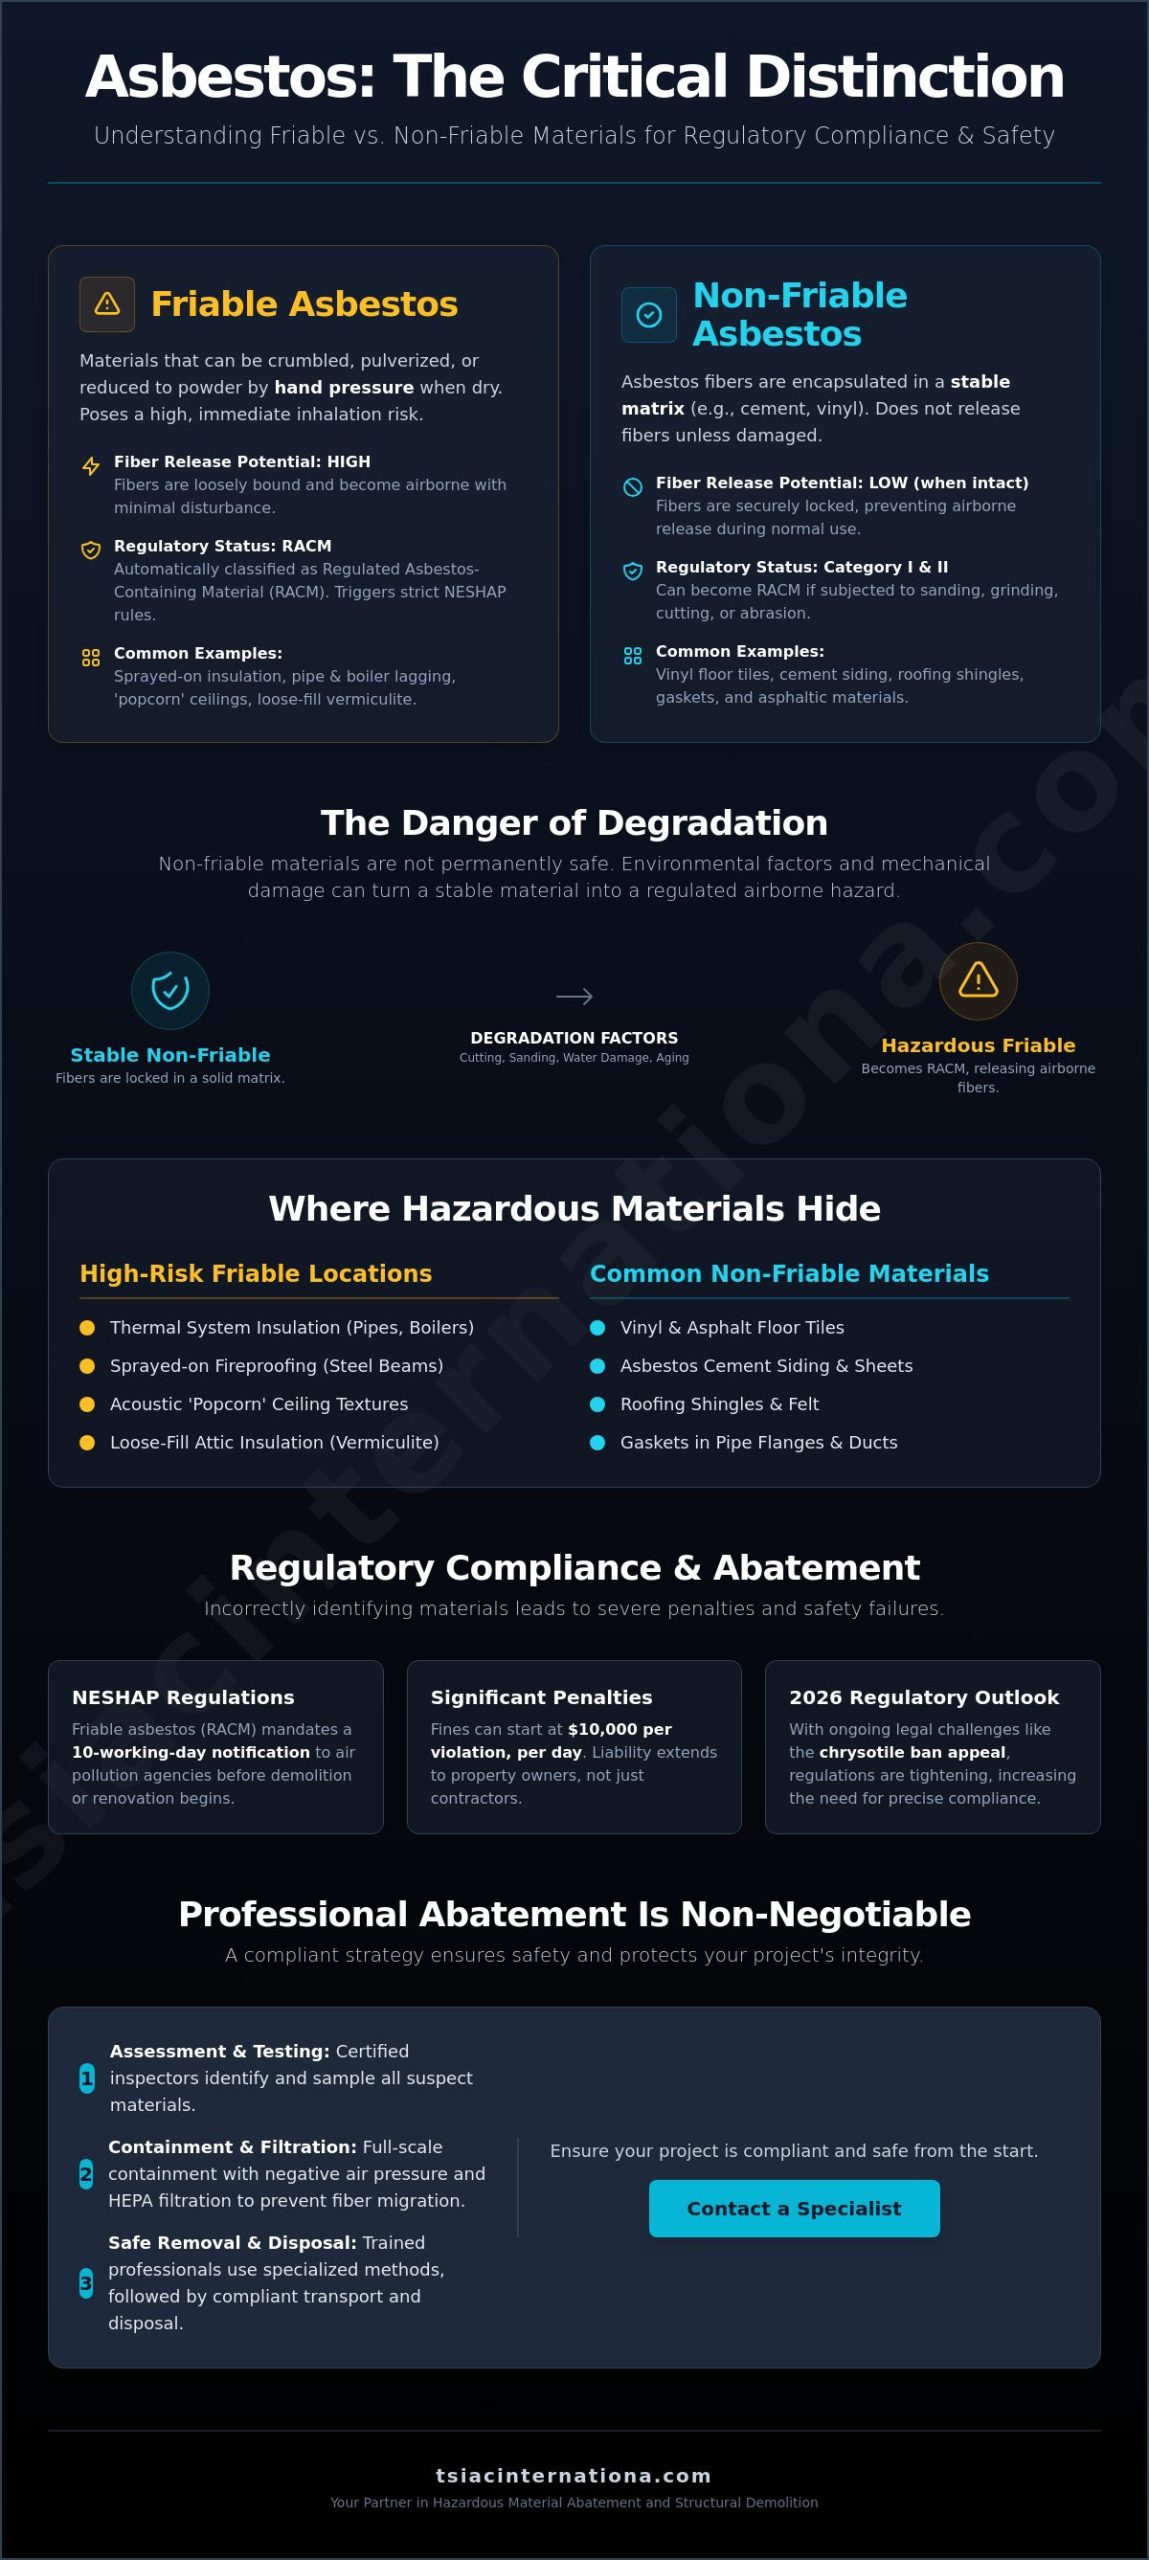
The regulatory landscape for lead hazards is complex and unforgiving. The EPA, under 40 CFR Part 745, establishes the requirements for project design and certification. As of January 12, 2026, the EPA has implemented significantly stricter Dust-Lead Action Levels, reducing the floor clearance threshold to just 5 µg/ft². Any detectable level of lead in dust is now considered a reportable hazard. Simultaneously, OSHA 1926.62 governs the construction environment, focusing on worker protection through air monitoring and PPE enforcement. For residential or public housing, HUD guidelines provide the definitive methodology for risk assessment and final clearance testing.
When is Independent Monitoring Required?
While some small-scale residential tasks might not mandate oversight, lead abatement project monitoring is essential for large-scale commercial renovations and structural demolition projects. High-risk environments like schools, hospitals, and childcare facilities require continuous surveillance to protect vulnerable populations. Furthermore, institutional lenders and insurance carriers often mandate third-party monitoring as a condition of funding or coverage. This requirement ensures a defensible paper trail exists to prove that the property was handled with professional care, effectively mitigating long-term liability for the owner.
The Critical Responsibilities of a Lead Project Monitor
A project monitor acts as the technical conscience of a remediation site. Their responsibilities are divided into distinct phases. Each phase is designed to eliminate the risk of lead exposure. Lead abatement project monitoring ensures that the contractor’s work plan is a functional safety system. The monitor acts as the property owner’s representative, providing a level of technical scrutiny that an abatement contractor cannot provide for themselves. It’s a role defined by meticulous observation and data-driven verification.
Phases of Project Oversight
During mobilization, the monitor performs a critical pre-abatement inspection. This involves verifying that containment barriers are constructed from the correct mil-thickness polyethylene. They also ensure HEPA-equipped air filtration devices are properly sealed and vented. The monitor audits the contractor’s staff to confirm every individual holds necessary certifications. Once work begins, the active phase involves daily site surveillance. The monitor checks that workers follow Personal Protective Equipment (PPE) protocols. They observe work practices to ensure dust-minimizing techniques are utilized. If a breach in containment occurs, the monitor has the authority to halt work immediately. Finally, the demobilization phase requires oversight of final cleaning and waste disposal manifests.
Environmental sampling provides objective proof of site safety. This includes area air monitoring to detect lead dust migration beyond the containment perimeter. The monitor ensures that no hazardous particles escape the work zone. As work concludes, the monitor conducts dust wipe sampling. Under the updated 2026 federal standards, these samples must meet the stringent 5 µg/ft² floor clearance level. These requirements are outlined in the EPA lead abatement program. Only laboratory results can confirm these levels. Once confirmed, the site is declared safe for re-occupancy.
Documentation and Reporting
Documentation is the final, essential responsibility. The monitor maintains a comprehensive daily log of site conditions and contractor compliance. This record-keeping creates a defensible paper trail. For property owners, this is the primary defense against future liability claims. It proves the project was managed with methodological precision. The monitor issues a final clearance report required for project closeout. When dealing with high-stakes environments, partnering with a firm experienced in professional lead abatement ensures these standards are never compromised.
Technical Monitoring Methods: Air Sampling and Dust Wipes
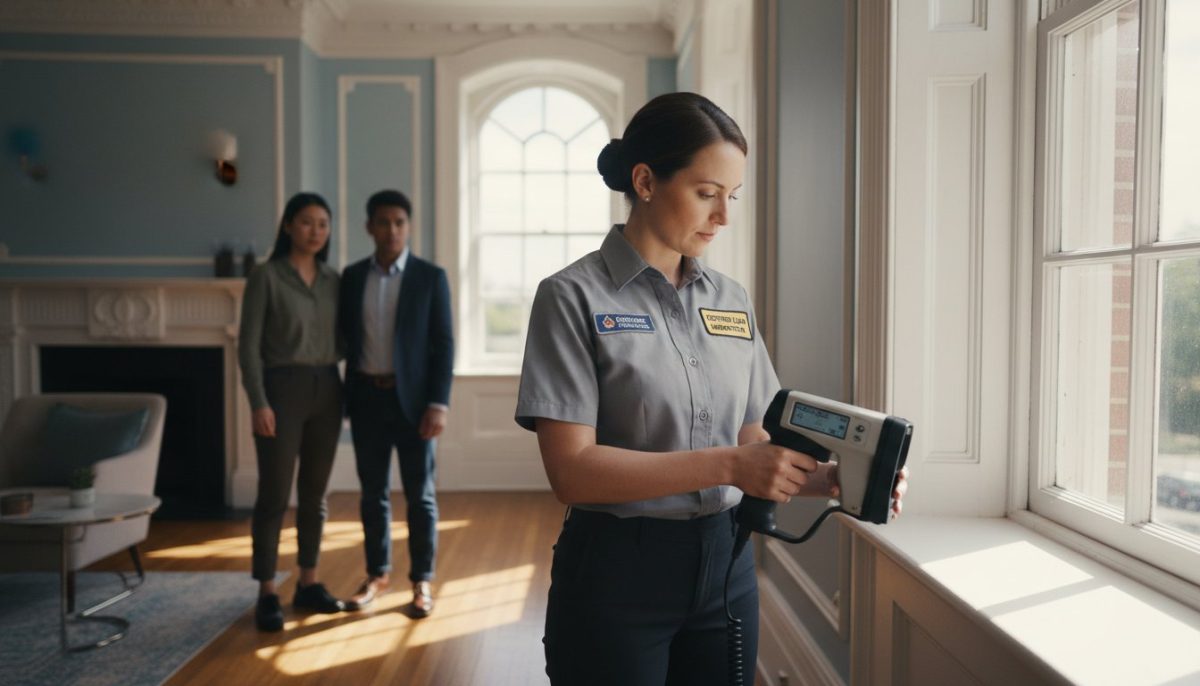
Technical verification is the backbone of site safety. While visual inspections identify obvious hazards, only scientific sampling can confirm the absence of microscopic lead particles. As an integral part of lead abatement project monitoring, professionals utilize various diagnostic tools to validate the effectiveness of engineering controls. One such tool is X-Ray Fluorescence (XRF) testing. This technology allows for real-time analysis of lead concentrations on painted surfaces and substrates. It provides immediate data without the need for destructive sampling, ensuring that the abatement strategy is based on precise physical evidence rather than assumptions.
Understanding Air Sampling Protocols
Air monitoring is categorized into two distinct types: personal and area sampling. Personal air monitoring involves attaching low-volume pumps to workers to measure the lead exposure levels within their breathing zone. This data is used to calculate the Time-Weighted Average (TWA), which determines if the respiratory protection provided is adequate for the task. The Occupational Safety and Health Administration (OSHA) sets the Permissible Exposure Limit (PEL) for lead at 50 micrograms per cubic meter of air (50 µg/m³), averaged over an eight-hour workday. If levels exceed this limit, the project monitor must enforce stricter hygiene and safety protocols.
Area air monitoring serves a different purpose. High-volume air pumps are placed at stationary points both inside and outside the containment perimeter. These pumps draw a larger volume of air to detect even trace amounts of lead dust that might have escaped the work zone. This constant surveillance ensures that the building’s HVAC systems and adjacent occupied areas remain uncontaminated. If area samples show elevated levels, it indicates a failure in the containment barrier or negative pressure system, requiring an immediate work stoppage and corrective action.
Clearance Testing and Laboratory Analysis
The final stage of lead abatement project monitoring is the clearance process. This begins with a rigorous visual inspection, often called the “white glove” test. The monitor examines every surface within the work area to ensure it’s free of all visible dust, debris, or residue. Only after the site passes this visual threshold can dust wipe sampling begin. Following the EPA guidelines on lead abatement, monitors use specialized wipes to collect samples from floors, window sills, and troughs.
These samples are then sent to an AIHA-accredited laboratory for analysis. As of January 2026, the EPA has lowered the post-abatement clearance levels for lead dust to 5 µg/ft² for floors. This standard is significantly more demanding than previous regulations. Using an accredited laboratory is non-negotiable; it ensures that the results are legally defensible and technically accurate. A project is only considered complete when the laboratory reports confirm that lead concentrations are below these new, stricter federal thresholds.
Why Independent Monitoring is Essential for Property Owners
The most significant risk in any remediation project is the inherent conflict of interest that arises when a contractor monitors their own performance. While most firms operate with integrity, the pressure of deadlines and budget constraints can lead to overlooked details or simplified safety procedures. Independent lead abatement project monitoring eliminates this risk by introducing an objective third party whose sole priority is technical accuracy and site safety. This separation of duties ensures that every barrier, filtration unit, and cleaning cycle meets the high standards required for a successful project closeout.
For property owners, this oversight is not an added expense; it’s a critical investment in risk management. A project monitor acts as your technical advocate, ensuring that the abatement firm adheres to the specific scope of work and regulatory requirements. Without this independent voice, you’re forced to rely on the contractor’s self-reporting, which may not hold up under the scrutiny of an EPA audit or a civil litigation process. Professional oversight provides the peace of mind that your facility is being handled with methodological precision.
Mitigating Legal and Financial Risks
The legal landscape surrounding lead exposure is unforgiving. Property owners can face severe financial penalties if a project fails to meet the updated 2026 EPA clearance standards. Professional monitoring prevents these fines by catching errors in real-time, long before they become reportable violations. Beyond immediate compliance, a monitor creates a comprehensive, defensible paper trail. This documentation is vital for “due diligence” during property transfers or when securing financing. It proves to future buyers, lenders, and insurers that the lead hazards were managed according to the highest industry standards, protecting the long-term value and reputation of your asset.
Quality Control and Contractor Accountability
Accountability is the cornerstone of high-stakes hazardous material management. A project monitor verifies that the contractor uses the exact methods specified in the project design, such as wet-scraping or HEPA vacuuming, rather than faster but more hazardous alternatives. They also oversee the demobilization phase, ensuring that hazardous waste is properly manifested and transported to authorized facilities. This prevents the nightmare scenario of “orphan waste” being linked back to your property due to contractor negligence. If technical disputes arise, the monitor provides an expert, evidence-based perspective to resolve the issue without compromising safety.
Catching a containment breach early is far more cost-effective than performing a full-scale decontamination of a building after the project is complete. By maintaining a constant presence, monitors prevent expensive re-cleaning cycles and project delays. Most importantly, this process ensures the absolute safety of future building occupants. When you need to ensure your remediation project meets these rigorous standards, partnering with experts in professional lead abatement is the only way to guarantee a compliant and safe result.
Professional Hazardous Material Management with TSIAC International
With over 15 years of operational experience, TSIAC International has established itself as a leader in managing complex hazardous material challenges. Our expertise extends across structural demolition and selective removal, providing property owners with a single, reliable partner for multifaceted projects. We don’t just perform removals; we provide a disciplined framework for environmental responsibility. This commitment to site safety has allowed us to serve commercial and government clients on a national scale, ensuring that high-stakes remediation is executed without compromise.
Our Approach to Lead Abatement Monitoring
Technical precision is the hallmark of our methodology. By integrating lead abatement project monitoring with specialized hazardous material abatement in South Carolina, we create a seamless workflow that eliminates communication gaps between contractors and monitors. We adhere to the most rigorous industry standards for containment and disposal, ensuring that every milligram of lead-bearing waste is accounted for. Detailed documentation is provided for every phase of the demolition process, giving property owners a transparent record of compliance and safety.
Partnering for Safe Project Completion
Successful remediation requires expert coordination between property owners, abatement teams, and regulatory bodies. Our team acts as the central hub for this collaboration, translating complex technical requirements into actionable site protocols. Lead abatement project monitoring under our supervision means that technical disputes are resolved with data, not guesswork. TSIAC International ensures that every project meets or exceeds national safety benchmarks through the application of proven engineering controls and methodical site surveillance. Contact TSIAC International today for professional project monitoring and abatement services that protect your assets and your people.
Ensuring Long-Term Safety and Regulatory Compliance
Effective hazardous material management requires more than just physical removal. It demands a rigorous, data-driven approach to safety that only an independent specialist can provide. By prioritizing lead abatement project monitoring, you ensure your facility meets the demanding 2026 EPA standards while building a defensible record of compliance. This technical oversight transforms a high-risk liability into a controlled, transparent process that protects both your financial assets and the health of future occupants.
With over 15 years of industry experience, TSIAC International serves as a premier partner for commercial and government remediation projects on a national scale. Our team consists of EPA and OSHA compliance experts who specialize in maintaining zero-exposure environments through methodical site surveillance and advanced sampling. Don’t leave your regulatory standing or site safety to chance. Secure Your Project with TSIAC International Monitoring Services and move forward with the confidence that your remediation is in expert hands. We’re ready to help you achieve a safe, compliant, and successful project closeout.
Frequently Asked Questions
Is lead abatement project monitoring required by law for all buildings?
Legal requirements vary depending on the building’s use and the project’s funding source. Federal EPA regulations mandate specific abatement and clearance procedures for pre-1978 housing and child-occupied facilities. For commercial properties, while federal law focuses on worker protection through OSHA, many local jurisdictions and institutional lenders require independent lead abatement project monitoring to ensure compliance with the 2026 dust-lead action levels. This oversight is often a prerequisite for obtaining a certificate of occupancy after a major renovation.
How long does a typical lead clearance inspection take?
A standard clearance inspection for a single-unit project generally takes between two and four hours. This timeframe includes a meticulous visual assessment of all surfaces to ensure no dust or debris remains, followed by the collection of dust wipe samples according to EPA protocols. For large-scale commercial or industrial sites, the process may span several days. Property owners must also factor in 24 to 48 hours for laboratory analysis, as re-occupancy cannot occur until the results confirm the site meets safety thresholds.
What happens if a lead dust wipe sample fails the clearance test?
If any sample exceeds the federal limit, such as the 5 µg/ft² threshold for floors, the affected area must remain under containment and undergo a new cycle of specialized cleaning. The contractor must use HEPA vacuuming and wet-washing techniques to remove the residual lead particles. After this cleaning, the project monitor returns to perform another visual inspection and collect a new set of samples. This cycle repeats until laboratory results confirm the environment is safe for re-occupancy.
Can my abatement contractor perform their own project monitoring?
A contractor cannot serve as the independent project monitor for official clearance purposes. While abatement firms often perform internal quality checks, lead abatement project monitoring must be conducted by an un-affiliated third party to prevent a conflict of interest. This separation of duties is essential for creating a defensible paper trail. It ensures that the person verifying the safety of the site isn’t the same person responsible for the costs and labor of the removal work.
What is the difference between lead paint testing and project monitoring?
Lead paint testing is a preliminary diagnostic step used to identify where lead is located and its concentration before a project begins. Project monitoring is a comprehensive oversight service that occurs during and after the abatement. Monitoring includes active site surveillance to ensure containment holds, air sampling to protect adjacent areas, and final clearance testing. Testing tells you that a hazard exists; monitoring ensures the hazard is removed without creating new environmental risks.
How much does lead abatement project monitoring typically cost?
The cost for monitoring depends on the project’s scale, the duration of on-site surveillance, and the total number of laboratory samples required. Factors such as the need for expedited lab results or specialized air monitoring for large worker crews will influence the total investment. Property owners should ensure their monitoring budget accounts for both the professional’s technical time and the direct costs of AIHA-accredited laboratory analysis for each dust wipe and air cassette collected.
What qualifications should a lead project monitor have?
A professional monitor must hold current state or federal certifications as a Lead Project Monitor or Lead Risk Assessor. They should possess a deep understanding of OSHA 1926.62 and EPA 40 CFR 745 regulations. Beyond certifications, the monitor should have a proven track record in industrial hygiene and experience in complex construction environments. Their ability to accurately interpret laboratory data and manage technical disputes between owners and contractors is vital for project success.
Does monitoring include oversight of hazardous waste disposal?
Yes, a comprehensive monitoring plan includes the verification of hazardous waste protocols. The monitor ensures that all lead-contaminated materials are properly contained in 6-mil polyethylene bags and labeled according to DOT requirements. They also audit the waste shipment manifests to confirm that the debris is transported by a licensed hauler and delivered to a permitted hazardous waste landfill. This oversight prevents the property owner from being held liable for improper waste handling or illegal dumping by a contractor.