A single microscopic asbestos fiber can remain airborne for up to 72 hours, which means the margin for error during a structural renovation is effectively zero. You’re right to feel a sense of caution when approaching older properties, especially since the EPA’s March 2024 final rule significantly tightened the regulations surrounding chrysotile asbestos. It’s a common concern that multi-layered wall materials might hide legacy contaminants that could compromise an entire job site if handled incorrectly.
This technical guide explains exactly how to test for asbestos in walls using rigorous protocols that prioritize both environmental safety and regulatory compliance. You’ll gain a clear understanding of the professional sampling methodologies required to identify hazardous fibers within drywall, plaster, and joint compounds. We’ll outline the precise path from initial site assessment to NVLAP-accredited laboratory testing, providing you with the engineering precision needed to move toward a safe removal process or a confident, compliant renovation.
Key Takeaways
- Recognize the engineering necessity of testing wall structures to mitigate the risk of fiber release during electrical or plumbing penetrations.
- Differentiate between surface finishes and internal structural insulation to pinpoint high-risk zones within varied wall assemblies.
- Master the professional protocols for how to test for asbestos in walls, prioritizing certified laboratory analysis over unreliable consumer-grade testing kits.
- Implement rigorous safety measures during the sampling process, such as site saturation and air system management, to maintain a controlled environment.
- Evaluate the technical requirements for structural abatement versus enclosure strategies to ensure long-term site compliance and safety.
Understanding the Necessity of Asbestos Testing in Walls
Asbestos wall testing is a rigorous professional protocol designed to identify microscopic mineral fibers hidden within common building materials. It’s not a visual inspection. Instead, it’s a technical process that requires laboratory analysis to confirm the presence of hazardous silicates. For structures built between 1930 and 1980, walls represent a significant reservoir of legacy materials. During this 50 year window, manufacturers frequently added asbestos to drywall joint compounds, plaster, and thermal insulation to improve fire resistance and structural durability.
Walls are high risk zones because they serve as the primary conduits for a building’s infrastructure. Homeowners and contractors often disturb these surfaces during routine electrical upgrades or plumbing repairs. Understanding how to test for asbestos in walls is the only reliable way to ensure that a simple renovation doesn’t turn into a localized environmental crisis. Professionals categorize these materials based on their physical state: friable or non-friable. Friable asbestos, such as loose-fill insulation that has settled into wall cavities, crumbles under slight hand pressure. Non-friable materials, like asbestos cement siding or vinyl wall tiles, are more stable but become equally dangerous if they are cut, ground, or shattered.
The Risks of Accidental Disturbance
A single mechanical action like drilling or sanding can release millions of microscopic fibers into a confined residential space. These fibers stay airborne for hours due to their light weight and needle-like structure. Inhaling these particles leads to permanent physiological damage, including asbestosis and mesothelioma. Because symptoms often take 20 to 50 years to manifest, the threat is frequently underestimated. Property owners must prioritize safety by reviewing a comprehensive hazardous material abatement South Carolina guide before starting any structural work. Educating yourself on the dangers of asbestos is the first step in responsible property management.
Legal and Regulatory Requirements for Testing
Federal EPA and OSHA regulations mandate specific inspection protocols before any renovation or demolition activity begins. By 2026, municipal building departments have become increasingly strict, often requiring a certified negative test result before they’ll issue a demolition permit. Documentation is vital. A professional report proving the absence of asbestos protects property owners from future liability during a resale. It also ensures that workers are not exposed to illegal levels of toxic dust. Knowing how to test for asbestos in walls through official channels provides a clear paper trail that satisfies both insurance adjusters and health inspectors.
Identifying Asbestos-Suspect Materials Within Wall Structures
Accurate identification of hazardous materials requires an understanding of structural layers rather than a simple surface inspection. You cannot identify asbestos by sight. The fibers are microscopic, often measuring less than 10 micrometers in length, which makes them invisible to the naked eye. When determining how to test for asbestos in walls, you must distinguish between the “skin” of the wall, such as the paint or wallpaper, and the internal components where asbestos was traditionally used for its tensile strength and thermal resistance. Relying on professional asbestos testing is the only way to confirm the presence of these minerals before disturbing any surface.
Drywall and Joint Compound (The “Mud”)
While the gypsum core of a drywall panel is often free of contaminants, the joint compound used to seal seams and screw heads is a primary concern. During the mid-20th century, manufacturers added chrysotile asbestos to “mud” to prevent cracking and improve fire ratings. In the 1970s, contractors frequently applied a “skim coat” across entire walls to create specific textures, effectively wrapping rooms in a thin layer of asbestos-containing material. Sampling this material is technically demanding because the lab must separate the thin layer of compound from the paper backing of the drywall to get an accurate percentage reading.
Plaster and Lath Systems
In structures built before 1950, plaster and lath were the standard. You might find natural horsehair used as a binder in residential settings, but commercial-grade plaster often utilized asbestos for its superior fireproofing capabilities. This material becomes extremely dangerous during selective demolition projects. When the plaster is broken or sanded, it releases high concentrations of dust. If the plaster feels unusually hard or was applied in a high-heat area, like behind a boiler or fireplace, the probability of asbestos reinforcement increases significantly.
In-Wall Insulation (Vermiculite and Batting)
Internal wall cavities often hide the most volatile forms of asbestos. Vermiculite insulation, which looks like small shiny pebbles, was frequently poured into the hollow cores of cinder block walls. Between 1919 and 1990, roughly 70% of the world’s vermiculite came from a mine in Libby, Montana, which was naturally contaminated with tremolite asbestos. Industry standards dictate that vermiculite should always be presumed positive for asbestos until proven otherwise. For projects involving older industrial or residential insulation, consulting a specialized asbestos removal South Carolina guide is necessary to understand regional regulatory requirements and disposal protocols.
Identifying these materials is the first step in maintaining a safe job site. If you’re planning a renovation, ensure your team is protected by scheduling complex structural assessments to identify hidden hazards before work begins.
Professional Testing Protocols vs. DIY Asbestos Kits
Retail hardware store kits promise convenience but frequently fail the rigors of industrial safety standards. These “instant” tests often lack the sensitivity required to detect asbestos fibers embedded in complex wall matrices. For a definitive result on how to test for asbestos in walls, one must rely on Polarized Light Microscopy (PLM). Certified laboratories use PLM to examine samples at high magnification, identifying the specific mineral morphology of fibers like chrysotile or amosite. Without this specialized equipment, a negative result from a home kit provides a false sense of security that can lead to hazardous exposure during renovation.
The technical precision required for asbestos identification isn’t available in a $50 over-the-counter box. Professional labs follow NVLAP (National Voluntary Laboratory Accreditation Program) standards to ensure that even trace amounts of fibers, often less than 1% by volume, are accurately recorded. For commercial property owners, using uncertified testing methods is a major liability. If a worker is exposed because a DIY kit failed to detect fibers, the building owner faces massive legal and financial repercussions. Professional testing isn’t just about safety; it’s a critical component of risk management and asset protection.
The Limitations of DIY Sampling
Homeowners and property managers often overlook the stratified nature of wall systems. A single surface scrape rarely captures the joint compound, which is the component most likely to contain asbestos in post-1950s construction. DIY sampling also lacks a documented chain of custody. This omission creates significant liability, as undocumented samples hold no weight in legal or insurance disputes. Most critically, DIY extraction lacks environmental controls. Without a HEPA-filtered vacuum and specialized wetting agents, the act of cutting a sample can release millions of microscopic fibers into the HVAC system, causing widespread cross-contamination.
What a Professional Inspector Provides
Engaging an accredited AHERA (Asbestos Hazard Emergency Response Act) inspector ensures the process follows strict regulatory frameworks. An inspector doesn’t just take random pieces of wall; they develop a formal Sampling Plan based on the material’s homogeneity. For instance, EPA protocols often dictate a minimum of three samples for surfacing materials covering less than 1,000 square feet to ensure statistical accuracy. This systematic approach is the industry standard for how to test for asbestos in walls correctly. The resulting report provides more than a simple binary answer. It details the exact fiber percentage and type, which determines the specific abatement procedures required by law. This level of precision maintains the structural safety and long-term value of the property.
- AHERA Accreditation: Ensures the inspector has completed 24 hours of initial training and annual refreshers.
- Statistical Sampling: Prevents “false negatives” by testing multiple points in a single room.
- Legal Documentation: Provides a certified paper trail for future property transactions or inspections.
The Step-by-Step Procedure for Wall Asbestos Sampling
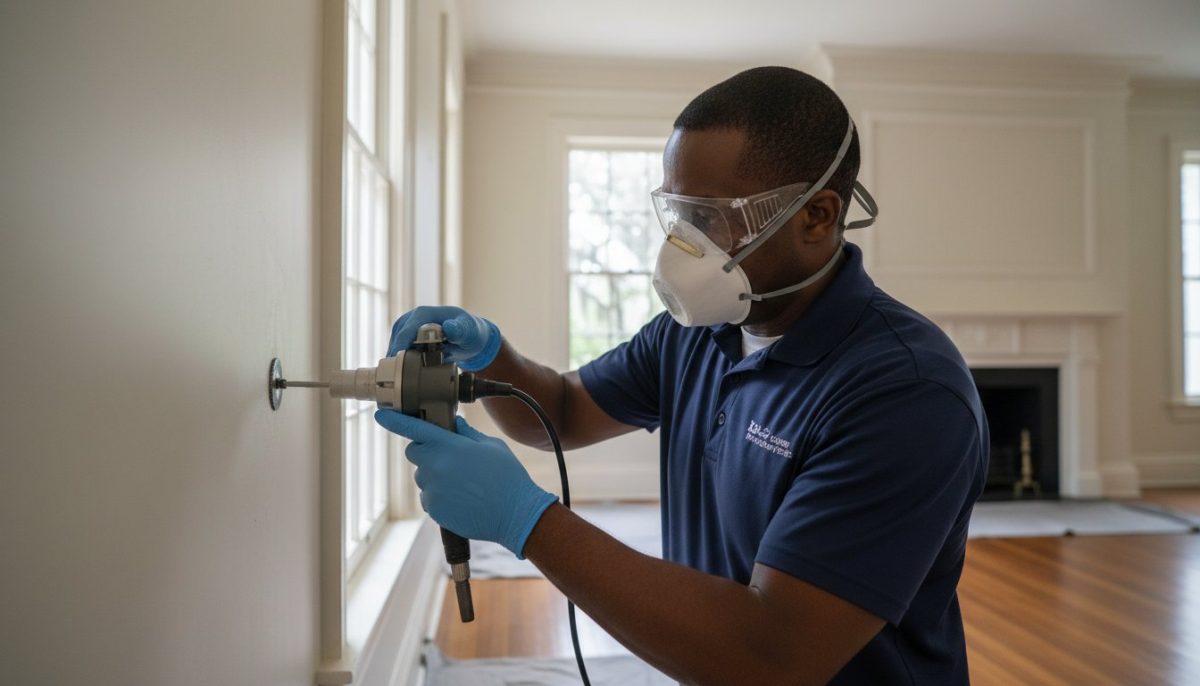
Professional asbestos sampling isn’t a simple task of scraping a surface; it’s a controlled engineering process that requires technical precision to ensure occupant safety. When determining how to test for asbestos in walls, the primary objective is to extract material without releasing friable fibers into the ambient air. The process begins with total isolation. Technicians must deactivate all HVAC systems and seal supply and return vents with 6-mil polyethylene sheeting to prevent fiber drift throughout the building’s ventilation network.
Before any physical penetration occurs, the sampling site is treated with amended water. This solution, typically water mixed with a surfactant or wetting agent, reduces the surface tension and allows the liquid to penetrate deep into the wall’s structure. By saturating the material, we suppress dust at the source, ensuring that any particles generated during the cut remain heavy and localized rather than becoming airborne.
Core Sampling Techniques
Technicians use a specialized circular hole saw or a stainless steel coring tool to perform a clean, surgical extraction. This method is superior to breaking off chunks of material because it maintains the structural integrity of the surrounding area and minimizes debris. It’s standard practice to collect samples from multiple locations across a single wall, especially in structures built before 1980, to account for various renovation eras where different joint compounds or plasters might’ve been used. A representative sample is a vertical cross-section of the wall assembly that captures every distinct layer of material, from the outermost paint and skim coat to the underlying plaster, lath, or drywall substrate.
Maintaining the Containment Zone
Effective containment relies on physical barriers and specialized equipment like “glove bags” designed for small-scale wall sampling. These bags allow the technician to manipulate tools inside a sealed environment, keeping all dust contained within the plastic sleeve. We always utilize heavy-duty drop cloths to catch any incidental fallout during the procedure. Demolition site safety starts with these containment measures, ensuring that the preliminary testing phase doesn’t create the very contamination it’s meant to identify. Post-sampling cleanup involves a two-stage protocol: wet wiping all surfaces with disposable cloths and using a HEPA-filtered vacuum to clear the immediate work zone.
Once the sample is extracted, the hole must be patched immediately. Technicians apply a high-grade sealant or heavy-duty duct tape to encapsulate the exposed edges of the wall. Each sample is then double-bagged in labeled, airtight containers and transported to an NVLAP-accredited laboratory. These labs follow ISO/IEC 17025 standards to provide the definitive analysis required for legal and safety compliance. For complex industrial or commercial structures, it’s vital to rely on professional site assessment services to manage these high-stakes procedures.
From Positive Test to Safe Removal: Structural Abatement
A positive laboratory report marks the end of the diagnostic phase and the beginning of a high-precision engineering challenge. Once you’ve followed the protocols on how to test for asbestos in walls and confirmed the presence of chrysotile or amosite fibers, the project shifts from assessment to remediation. You generally face two choices: enclosure or abatement. Enclosure involves sealing the contaminated wall behind a permanent, airtight barrier. While this prevents fiber release in the immediate term, it leaves the hazardous liability within the building’s footprint. For long-term safety and unencumbered property value, structural abatement or full removal is the industry standard. Understanding how to test for asbestos in walls is the critical first step, but the transition to removal requires a specialized workforce trained in hazardous material handling and containment.
TSIAC International specializes in the surgical removal of hazardous walls, ensuring that fibers are extracted without compromising the structural integrity of the surrounding facility. A critical final stage in this process is the air clearance test. This is conducted by an independent third-party industrial hygienist to verify that fiber counts have dropped below the EPA limit of 0.01 fibers per cubic centimeter before the area is reopened for general use.
Selective Demolition and Wall Gutting
Professional commercial interior gutting services operate under strict negative pressure environments to prevent cross-contamination. During the gutting of contaminated walls, teams use HEPA-filtered vacuums and wet-stripping methods to keep dust levels at zero. Debris is double-bagged in 6-mil poly bags and transported to specialized hazardous waste landfills that are legally permitted to accept asbestos-containing materials. Our process isn’t just about disposal; we identify and recover non-porous, non-contaminated structural components. For instance, metal studs and tracks are thoroughly decontaminated and redirected to recycling facilities, which can reduce the environmental footprint of the demolition by up to 30%.
Choosing a Licensed Abatement Contractor
Selecting a partner requires verifying specific credentials that go beyond basic general contracting. You need a team that adheres to tsiac international charleston standards, which include comprehensive licensing, bonding, and a documented history of OSHA compliance. A professional contractor provides a full close-out project manual containing waste shipment records, daily site logs, and laboratory air clearance results. This documentation is vital for legal compliance and future property transactions. If your testing has confirmed a hazard, don’t delay the remediation process. Contact TSIAC International for professional abatement and demolition services to secure your facility’s safety with engineering precision.
Securing Your Structural Integrity Through Professional Verification
Managing hazardous materials requires technical precision and a disciplined approach to site safety. Understanding how to test for asbestos in walls is the first step in mitigating long-term risks associated with aging infrastructure. By identifying suspect materials like textured coatings or thermal insulation early, you prevent the accidental release of fibers during renovations. Our 2026 safety guide emphasizes that while DIY kits exist, they often lack the legal weight and accuracy of laboratory-certified sampling.
TSIAC International leverages over 15 years of hazardous material expertise to provide definitive answers for complex environments. We’re fully licensed and insured for structural demolition, which means we handle everything from the initial sample to the final teardown. Our team follows comprehensive recycling and disposal protocols to ensure that toxic waste doesn’t impact the surrounding ecosystem. It’s about more than just removal; it’s about engineering a safer space for everyone involved. Don’t leave your project’s safety to chance when professional verification is within reach.
Request a Professional Abatement Quote from TSIAC International
Taking proactive steps today ensures your property remains a safe, compliant, and valuable asset for years to come.
Frequently Asked Questions
Can I tell if wall plaster has asbestos just by looking at it?
You can’t identify asbestos in wall plaster through visual inspection alone because the fibers are 1,200 times thinner than a human hair. Professional testing is mandatory for any building constructed before the 1986 ban in the UK or the 1989 partial ban in the US. Even if the material looks like standard gypsum or lime plaster, it may contain 1% to 5% asbestos by weight to increase fire resistance and structural durability.
How much does it typically cost to have walls tested for asbestos?
Professional asbestos testing typically costs between $250 and $800 according to 2024 data from HomeAdvisor. This price covers the site visit, sample collection, and laboratory fees. While DIY mail-in kits are available for $40 to $100, these often lack the legal certification required for commercial projects or insurance compliance. Higher costs apply if the technician needs to sample multiple layers across several rooms or different floors.
Is it safe to live in a house while asbestos wall testing is being performed?
It’s safe to remain in the property during testing if the technician uses wet-sampling techniques and HEPA-filtered vacuums to prevent fiber release. The sampling process only requires a small piece of material, usually 1 square inch, taken from a discreet location. Professionals seal the sample site immediately with duct tape or a sealant to ensure the air remains clean. You don’t need to evacuate unless the walls are already severely damaged or crumbling before the inspector arrives.
What should I do if my wall test comes back positive for Chrysotile?
You must leave the material undisturbed or hire a licensed abatement professional if the test confirms Chrysotile, which represents 95% of asbestos used in global construction. If the wall is in good condition, the EPA suggests management in place rather than removal. When renovation is necessary, you’ll need a specialized team to set up a negative pressure enclosure. They’ll ensure fibers don’t migrate to other parts of the structure during the extraction process.
Does every wall in a house need to be tested before a remodel?
You don’t need to sample every square foot, but you must test every distinct type of finishing material across different construction phases. If a house had an addition in 1975, those walls require separate analysis from the original 1940s structure. Understanding how to test for asbestos in walls involves identifying homogeneous areas where the material appears identical. A certified inspector typically takes 3 to 9 samples per area to ensure a statistically accurate result.
How long does it take to get asbestos lab results back?
Standard laboratory processing takes between 24 and 72 hours from the time the lab receives the samples. Many facilities offer 3-hour or same-day rush services for an additional fee of $50 to $150 per sample. This timeline is critical for maintaining the momentum of your construction project. Once the analysis is complete, the lab issues a formal Certificate of Analysis detailing the asbestos percentage and fiber type found in each specific sample.
