
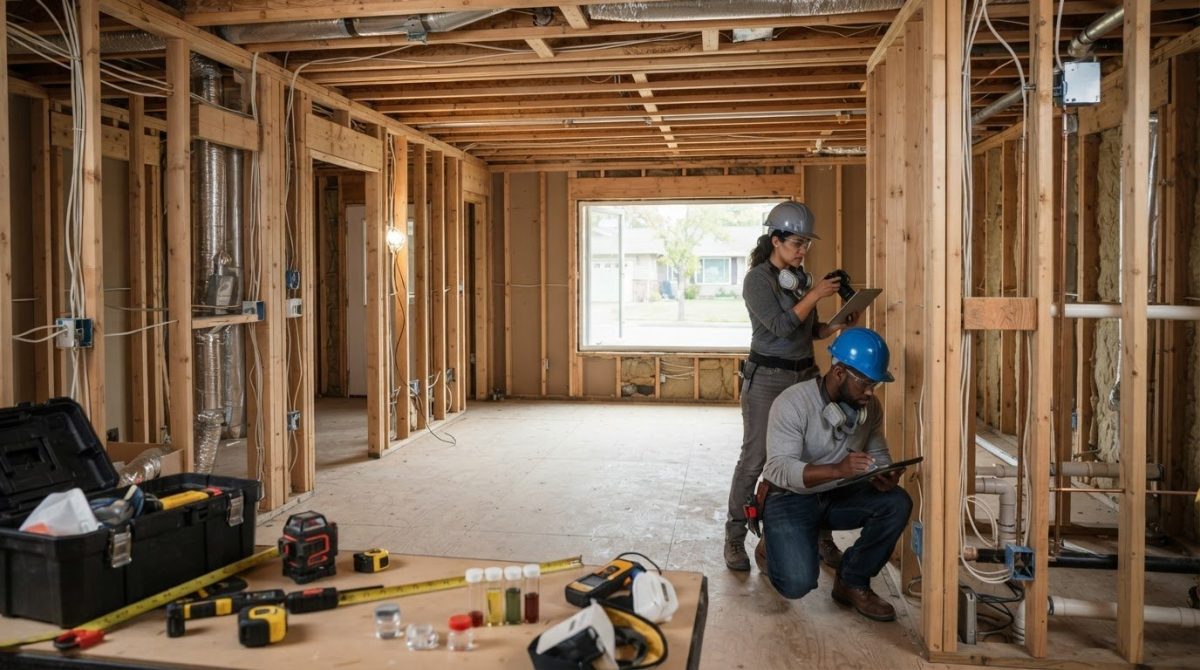
What if the most important work after demolition is deciding what not to cover back up? Understanding what to expect after a house is gutted starts with treating the exposed structure as an opportunity to identify concerns before renovation moves forward. With walls, ceilings, and flooring removed, framing, subfloors, and building systems may be visible, along with damage or materials that need careful assessment.
It’s normal to feel uncertain about whether the space looks as expected or which issue to address first. A clean-looking room doesn’t rule out hidden moisture, structural concerns, or hazardous materials. Rushing into new finishes can make problems harder to address. Careful documentation and safety checks help turn an exposed interior into a clear renovation plan.
This guide explains what to photograph and assess, how to prioritize safety questions and repairs, and how to prepare for the next phase. The order matters: resolve hazards and structural issues before rough-ins, insulation, drywall, and finishes begin. That sequence creates a more organized path from interior gutting to renovation decisions.
Key Takeaways
- What to expect after a house is gutted depends on the agreed demolition scope. Identify which surfaces and materials should remain before assessing the exposed interior.
- Treat the safety review as a decision point. Suspected asbestos- or lead-containing materials need appropriate assessment and handling before work proceeds.
- Build a room-by-room condition log with photographs, locations, and questions to clarify what needs further evaluation.
- Document conditions, address required assessments and repairs, then plan renovation work. This sequence can reduce avoidable rework.
- TSIAC International’s interior gutting, selective demolition, and asbestos and lead abatement capabilities can support a clearly scoped handoff between demolition and renovation.
What to Expect After a House Is Gutted: The Interior at a Glance
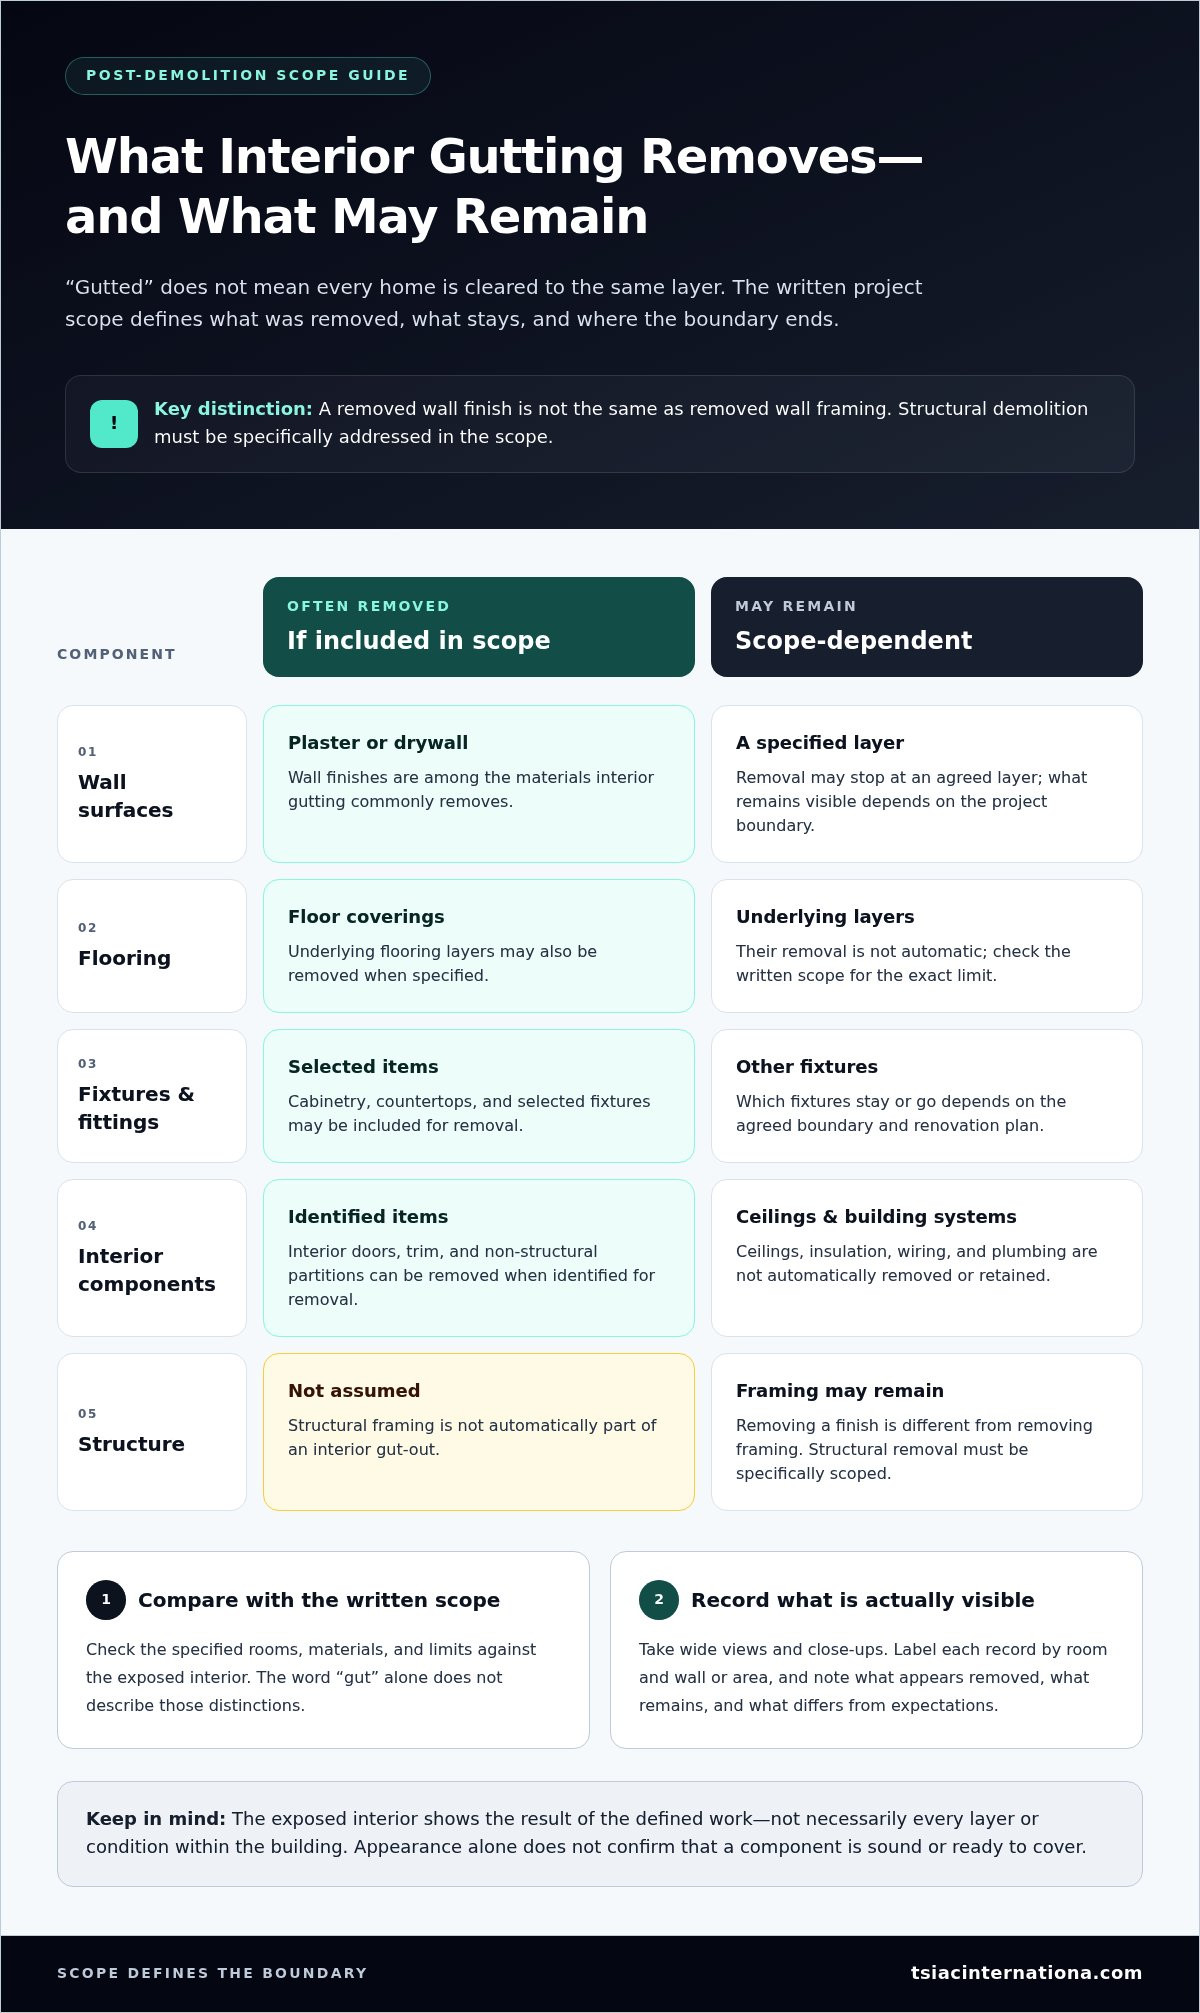
A gutted house is an interior stripped of specified materials and components up to an agreed project boundary. That boundary matters: “gutted” doesn’t mean every home has been cleared to the same layer, or that the structure itself has been removed. To understand what to expect after a house is gutted, compare the exposed interior with the written scope of work. It should define what was removed and what was meant to remain.
The result is a work in progress, not necessarily a uniform, empty shell. One room may expose framing while another retains a ceiling or system that wasn’t included in the removal. A broad overview of the different work renovation can involve is available in Renovation, but the project’s own scope determines the condition of this particular house.
What is usually removed, and what may remain?
Interior gutting commonly removes finish materials and selected components that obstruct the planned work. Depending on the scope, these may include:
- Wall finishes, such as plaster or drywall
- Floor coverings and, where specified, underlying flooring layers
- Cabinetry, countertops, and selected fixtures
- Interior doors, trim, or non-structural partitions identified for removal
Other components may remain in place. Ceilings, insulation, wiring, and plumbing are not automatically removed or retained. Their treatment depends on the agreed boundary and renovation plan. Structural framing is also not automatically part of an interior gut-out. Removing a wall finish is different from removing the wall’s framing, and any structural demolition must be specifically addressed in the project scope.
For example, a project may remove kitchen cabinets and wall finishes while leaving the ceiling and selected systems intact. Another may specify removal to the framing in certain rooms. The word “gut” alone doesn’t describe those distinctions. A clear scope identifies rooms, materials, and limits, reducing uncertainty about what the completed demolition should look like.
Why the exposed interior can look different from expectations
Previous alterations can leave different layers, materials, or construction details from one part of the house to another. A repaired section of wall may not match the original assembly, and an addition may have different finishes or systems from older rooms beside it. Project boundaries also shape what you see: if removal stops at a specified layer, that layer may remain visible rather than bare framing.
Some conditions are concealed until the materials covering them are removed. The exposed interior therefore shows what’s visible at the end of the defined work, not necessarily every layer or condition within the building. Don’t treat appearance alone as confirmation that a component is sound or ready to cover.
Before finalizing renovation decisions, document the actual post-work condition. Take wide views and close-ups, and label each record by room and wall or area. Note what appears removed, what remains, and where visible conditions differ from expectations. This record gives the renovation team a shared reference for resolving scope questions and identifying areas that need closer assessment.
Safety After a House Gut-Out: Address Hazards Before Rebuilding
A gutted interior can reveal conditions hidden behind finishes, but visibility alone doesn’t establish whether a room is safe for renovation work. Treat the safety review as a decision point: identify concerns, arrange appropriate assessment where needed, and resolve findings before work that could disturb affected materials continues. This pause helps prevent demolition debris, dust, and potential hazards from carrying into later phases.
What exposed materials may warrant further assessment?
In older homes, suspect finishes and building materials may warrant assessment, particularly if renovation work will cut, sand, drill, or remove them. Materials that could contain asbestos or lead can’t be reliably identified by appearance. Don’t scrape or disturb a suspect surface to investigate it. A qualified hazardous-material assessment can determine whether testing or other evaluation is appropriate and whether abatement is needed before the next work proceeds.
Assessment findings guide the next decision. If a concern is ruled out, renovation planning can account for that result. If a hazard is identified, the scope and required controls need to be addressed before affected work continues. TSIAC International performs asbestos and lead abatement as well as interior gutting and selective demolition, which can help align the demolition scope with hazard-related work. For general information about lead hazards in homes, consult HUD Lead Hazard Information.
A visual inspection can identify concerns, but it cannot replace a qualified hazardous-material assessment.
How to keep the work area controlled
Access should remain limited to the active work area in accordance with the project’s safety plan. That boundary matters after demolition, when exposed materials and loose debris can make movement through the site less predictable. Keep people who aren’t involved in the work out of restricted areas, and follow the established instructions for entry, protective measures, and material handling.
Manage dust and debris according to the project plan rather than sweeping or moving them casually between rooms. Avoid disturbing material that has been flagged for assessment, and keep debris handling consistent with established procedures. Exposed utilities also require attention: don’t assume that a visible line or connection is inactive. Handle utility concerns through the appropriate project procedures before work near them continues.
Requirements for inspections, permits, and hazardous-material work can vary by jurisdiction and project conditions. Consult current official federal, state, and local sources for the requirements that apply to the property rather than relying on a general rule of thumb. Document assessment results, affected locations, and work restrictions so the renovation team has a clear record of what must be resolved before rebuilding.
Once safety questions are addressed, the handoff can move forward with a defined scope and appropriate controls. TSIAC’s interior gutting and abatement work supports demolition planning when hazardous materials are part of the project.
Assess the Exposed House: Structure, Moisture, and Building Systems
Once the work area is accessible, use the exposed interior to create a clear record of visible conditions. This is documentation, not diagnosis: a photograph of a stain or damaged framing can help direct a follow-up assessment, but it can’t establish the cause or determine the necessary repair. For homeowners considering what to expect after a house is gutted, a room-by-room condition log turns scattered observations into useful information for renovation planning.
Document framing, floors, and visible moisture
Record what you can see without removing material or trying to test a component yourself. Note unusual movement, visible staining, corrosion, damaged framing, or areas that appear persistently damp. Photograph each item twice: first in context so its room and location are clear, then close up to show the detail. Include a consistent reference point, such as a doorway or wall corner. Use labels like “north wall” only if you can identify the orientation reliably.
If a condition appears to be changing, or you have an immediate concern about stability or water intrusion, flag it promptly for professional assessment. Avoid conclusions such as “foundation failure” or “active leak” based on appearance alone. Describe the evidence instead: “dark staining beneath window” or “floor feels uneven near doorway.”
| Visible observation | Follow-up to record |
|---|---|
| Staining or damp-looking surface | Location, extent, whether it changes, and assessment needed to identify the cause |
| Cracked, corroded, or damaged component | Close and room-context photos; note that the component needs appropriate professional evaluation |
| Uneven floor or unusual movement | Exact area and when it is noticed; note the need for an appropriate structural or trade review |
Map exposed plumbing, electrical, and ventilation components
Make a simple room-by-room map of visible system routes and components that renovation work may affect. Note pipes, wiring, vents, disconnected-looking connections, and their locations relative to doors, windows, or corners. Record labels only when they’re clearly visible. Don’t assume a line is active, inactive, safe, or correctly identified from its appearance.
Keep these observations separate from decisions about repair, replacement, or code compliance. Those conclusions depend on the system’s condition, project scope, and applicable requirements. Before finishes conceal the area, coordinate appropriate system assessments with the renovation plan so questions can be resolved while components remain accessible.
Keep the log consistent for each room: room name, wall or area, photo references, what is visibly present, and questions for follow-up. This format helps the people planning the next phase distinguish observed conditions from items that need professional evaluation. It also supports a more precise handoff before repairs or finishes are finalized.
Plan the Next Renovation Phase in a Clear, Safe Sequence
Renovation planning should begin with the conditions demolition has actually exposed, not with finish selections alone. A sound handoff connects the completed scope, documented conditions, safety findings, and next work decisions. This sequence helps prevent new materials from concealing unresolved issues and reduces the risk of planning around assumptions rather than verified conditions.
A practical sequence from cleared interior to renovation planning
- Complete a documented walkthrough. Compare the exposed rooms with the agreed demolition scope. Record what was removed, what remains, and any visible conditions that differ from expectations. Use consistent room and location labels so each note can be traced to the relevant area.
- Resolve safety questions. Review required hazardous-material assessments and applicable safety controls before disturbing affected areas or proceeding with work that could conceal them. A suspected hazard needs appropriate assessment, not a guess based on appearance.
- Determine necessary repairs. Use assessment findings to define follow-up for framing, moisture concerns, and building systems. The work required depends on the property’s condition and renovation scope. Don’t assume a visible issue has a particular cause or remedy before it’s evaluated.
- Coordinate design and trade scopes. Decisions about structural elements and plumbing, electrical, or ventilation systems affect where new partitions, insulation, and finishes can go. Align the plans and trade scopes while those components remain accessible. Work sequencing commonly places structural changes and system rough-ins before insulation and drywall, with finishes following later.
- Address applicable approvals before finish work. Determine whether inspections, permits, or other requirements apply to the property and planned work. Requirements vary by jurisdiction and scope, so use current official sources for the relevant location. Confirm necessary review points before enclosing work behind new finishes.
What to capture in the project handoff
Keep one organized project record rather than scattering decisions across messages, photographs, and separate notes. Include scope notes, room-by-room photographs, assessment documents, repair decisions, and unresolved questions. For each follow-up item, identify who is responsible for moving it forward and whether another task must happen first. For example, a finish layout may depend on the location of a system route or the outcome of a structural assessment.
Maintain a written list of approved scope changes, including the affected area and the decision made. This creates a shared reference when plans shift and helps distinguish authorized changes from assumptions. For background on how demolition planning and debris handling fit into the work, use a demolition-process guide as a companion resource.
A clear scope and orderly handoff make the transition from interior gutting to renovation planning more controlled. TSIAC International brings more than 15 years of demolition and abatement experience to residential and commercial interior gutting and selective demolition. Plan an interior gutting scope with TSIAC to establish a defined demolition boundary for the next phase.
How TSIAC Supports the Interior Gutting and Demolition Handoff
A useful demolition handoff begins before removal work starts. TSIAC International provides residential and commercial interior gutting, selective demolition, and structural demolition, with each project scope shaped around the work planned for the property. Understanding what to expect after a house is gutted becomes easier when the removal boundary is clear: renovation teams can see which components were designated for removal and which were intended to remain.
What a clearly scoped gutting project helps establish
A defined scope sets practical limits for the work. It can identify the rooms and materials involved, distinguish finishes from elements to retain, and clarify where selective demolition is planned. For example, the work may call for removing cabinets and wall finishes in one area while leaving specified components in place. Clear boundaries help reduce misunderstandings about what the exposed interior should look like when demolition is complete.
Scope and documentation also support a more orderly handoff. Notes about completed removals, retained elements, and visible conditions give the next project decisions a shared reference. They don’t replace an assessment of the exposed structure or systems, and demolition can’t be assumed to reveal every concealed condition. Some issues only become apparent as materials are removed, so findings may need to be documented and addressed as the project progresses.
Debris management is part of that process. TSIAC International incorporates recycling of wood, metal, and plastic on project sites as part of responsible material handling. Keeping removal work and debris management within a defined scope helps maintain clarity about the work area and what remains for the next phase. It doesn’t mean every material can be recovered or that all project conditions are predictable.
When to discuss demolition or abatement support
Demolition planning and safety decisions should align. If an assessment identifies asbestos- or lead-containing materials, the findings and project requirements help determine whether abatement is needed before related work proceeds. TSIAC International performs asbestos and lead abatement, along with interior gutting and selective demolition, so these services can support projects that include both removal and assessed hazardous materials. Abatement is based on the assessment and project needs, not appearance alone.
TSIAC International brings more than 15 years of demolition and abatement industry experience to this work. That experience provides relevant project context, not a guarantee that every hidden issue will be found or resolved through gutting. A careful handoff still depends on clear scope, documented conditions, and appropriate follow-up decisions before renovation work covers exposed areas.
If you’re defining an interior removal boundary, planning selective demolition, or coordinating assessed abatement needs, discuss the demolition or abatement scope with TSIAC International. A focused conversation about what must be removed, what should remain, and what safety considerations are part of the project can help establish a clearer starting point for the renovation phase.
Move From Demolition to a Defined Next Step
The exposed interior is a planning point, not a signal to begin covering surfaces immediately. Use the record of completed work and outstanding decisions to define what needs resolution before renovation advances. The clearest answer to what to expect after a house is gutted comes from matching the visible condition to the agreed scope, then making each next decision in order.
For projects that need a carefully defined demolition boundary, TSIAC International brings experience in residential and commercial interior gutting and selective demolition, with wood, metal, and plastic recycling incorporated on project sites. Its more than 15 years in demolition and abatement provide relevant context for coordinating scope and handoff. The next step is a focused discussion about the demolition or abatement work your property requires, not a promise that demolition alone resolves every concealed condition.
Discuss your demolition or abatement project with TSIAC. A clear scope gives your renovation planning a more organized place to begin.
Frequently Asked Questions
Can you live in a house after it has been gutted?
Usually, a fully gutted house isn’t suitable for normal occupancy. Exposed framing, unfinished utilities, construction dust, missing fixtures, and restricted work areas can make daily activities impractical or unsafe. Even if one area appears usable, its access, separation from active work, and utility condition matter. Whether any part can be occupied depends on the property’s actual condition, work boundaries, and applicable requirements. Keep out of active areas until they’re cleared for use.
How long can a house stay gutted before renovation work begins?
There’s no single safe or suitable time limit for every property. Weather exposure, security, building condition, exposed materials, and the planned work all affect how the interior should be protected. Keep openings and access points secured as appropriate, and monitor the property for signs of water intrusion or changing conditions. If new damage appears, have it assessed before work resumes rather than assuming a generic waiting period is acceptable.
Does gutting a house remove the plumbing and electrical wiring?
Not necessarily. The agreed project scope determines whether fixtures, pipes, wiring, and other components are removed, disconnected, or left in place. For example, a bathroom gut-out might include removing fixtures while some concealed lines remain for assessment or planned reuse. Review the completed scope and note what’s still present before choosing new layouts or making assumptions about system condition. A visible component’s presence doesn’t confirm that it’s functional or ready for reuse.
Should I photograph a house after it has been gutted?
Yes. Photograph each room before repairs or new materials cover exposed areas. Use a consistent file name, such as “kitchen-east-wall,” and keep an overview image alongside close-ups so each detail has a clear location. Preserve the original files and add brief notes about what’s visible, without guessing at the cause. An organized record makes it easier to compare images with plans, track later changes, and find a specific component during renovation discussions.
What should homeowners remove before an interior gut-out starts?
Remove personal belongings, valuables, and items excluded from the work area, following the written preparation instructions and agreed scope. Move items intended to remain well away from the work zone, and keep access routes clear. Don’t remove fixtures or salvage materials unless the project plan assigns that task; they may be included in the demolition scope or require careful handling. Never disturb suspected hazardous materials yourself. Confirm that retained belongings are identified and protected as planned.
Can a gutted house reveal problems that were hidden behind walls?
Yes. Removing finishes can reveal signs that weren’t visible before, such as water staining, damaged material, or evidence of earlier alterations. A mark or damaged-looking area doesn’t establish its cause or show what repair is needed. Photograph the condition with enough surrounding context to locate it, then record the question it raises. If the finding could affect the planned layout or next work phase, arrange an appropriate assessment before changing the scope.
What happens to debris after a house is gutted?
Debris handling depends on the project scope, material type, and applicable requirements. Where practical, materials such as wood, metal, and plastic may be sorted for recycling rather than combined in a mixed waste stream. Suspected hazardous materials require separate controls and handling, so don’t place them with ordinary debris or move them yourself. Keep project records that distinguish what was removed, what was separated for recycling, and what required special handling.
