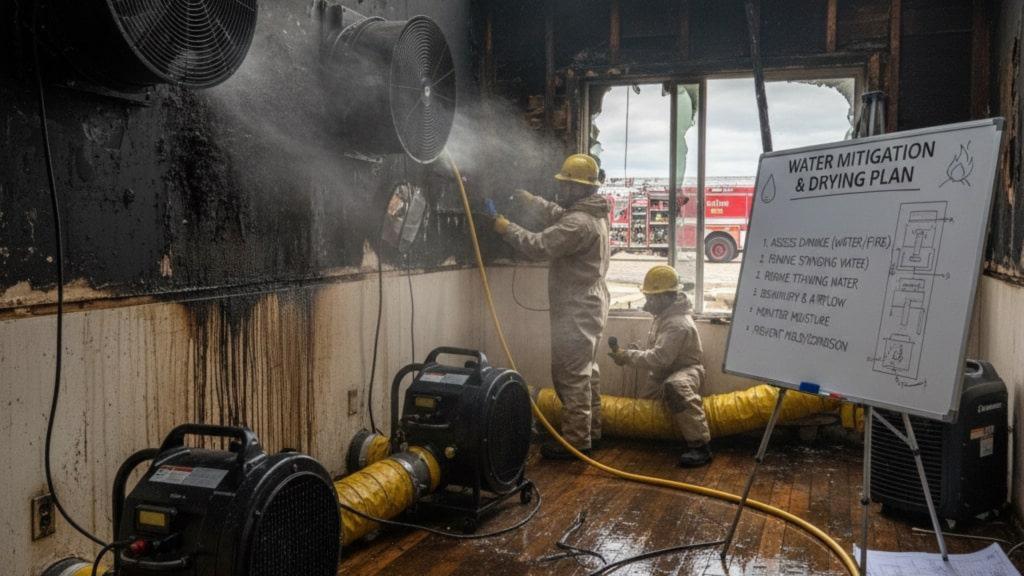
When a fire is put out, the fight isn’t over—the water that saved the structure can quickly destroy what’s left. Effective water mitigation in the first 24–72 hours is the difference between a controlled restoration and a full rebuild. At TSIAC International, we map precise drying plans that stop mold, rot, and corrosion before they start—and we coordinate selective removals, including interior gut demolition, only when the materials can’t be saved.
Why post-fire water is uniquely destructive
Firefighting saturates building assemblies from the top down. Thermal shock, steam, and soot push moisture deep into cavities where it lingers—behind baseboards, under plates, inside insulation, and within double layers of drywall. Add power loss (no HVAC) and you get warm, wet, stagnant air—perfect for microbial growth within 24–48 hours. Metals flash-rust, engineered wood delaminates, and gypsum loses structural integrity. A disciplined drying plan prevents those secondary losses.
The first 24 hours: stabilize and triage
- Site safety & utilities: Verify structural stability, electrical isolation, and air quality.
- Moisture mapping: Use thermal imaging and pin/pinless meters to trace moisture paths from roof to slab. Mark “wet lines” on floors and walls.
- Salvage vs. strip decisions: Prioritize high-value finishes, hardwoods, and built-ins. Pre-authorize targeted removals if readings remain above dry-standard after 24 hours.
- Set environmental targets: Aim for 40–50% RH and material readings at or below pre-loss baselines.
Build the drying plan (and stick to it)
A good plan is written, measurable, and adjusted with daily data. Ours typically includes:
1) Rapid bulk water removal
- Extraction first: Truck-mount or high-lift portable extraction removes gallons fast—every gallon you extract is one you don’t have to dehumidify.
- Soot-aware handling: Avoid pushing contaminated water into clean zones; use containment and floor protection at all transitions.
2) Controlled demolition (only what’s necessary)
- Targeted flood cuts: 12–24″ above the highest consistent wet line, not a blanket 4′ unless readings justify it.
- Insulation pulls: Wet batt or blown-in insulation loses R-value and traps moisture—remove it to open the cavity.
- Selective removals vs. interior gut demolition: If framing is charred or repeated monitoring shows persistent high readings, we escalate from selective removal to interior gut demolition to eliminate hidden moisture reservoirs and smoke-impacted materials efficiently.
3) Airflow that “pressurizes” the dry
- Air movers: Place along walls in a clockwise pattern, 6–10 feet apart, to shear boundary layers and push moisture toward dehumidifiers.
- Wall cavity drying: Use venting or negative-pressure systems (inject-dry) when assemblies must remain in place.
- HEPA filtration: Run air scrubbers when soot or char is present to reduce particulates while you dry.
4) Dehumidification matched to the load
- LGR/refrigerant dehumidifiers: Ideal for warm sites; stage to create a drying “assembly line.”
- Desiccants: For cold or large-loss conditions, deliver low-dew-point air and maintain performance across temperatures.
- Psychrometric control: Track GPP (grains per pound), RH, and temperature. The goal is a steady GPP drop and surface temperatures above dew point to prevent condensation.
5) Specialty surfaces and assemblies
- Hardwood floors: Use panel systems to pull vapor through seams; delay sanding until moisture content stabilizes.
- Cabinetry & millwork: Decouple toe-kicks and back panels to allow airflow; salvage when structural integrity remains.
- Crawl spaces & subfloors: If water migrated down, condition the crawl space with vapor barriers, directed airflow, and dehumidification—otherwise the floor system will re-wet.
Monitoring: what gets measured gets dry
Daily (sometimes twice-daily) documentation should include:
- Ambient readings: temp, RH, and GPP (inside vs. outside).
- Material readings: same meter, same scale, same locations each day.
- Equipment log: counts, locations, and amp draws.
- Photos of moisture map updates and any additional openings.
Drying is complete when materials reach pre-loss moisture content (or industry-accepted dry standards for that species/substrate) and stay there with equipment off for 24 hours.
Preventing mold and odor from the start
- Respond within hours: Microbial activity can begin in under 48 hours. An early start reduces demolition and cost.
- Clean before you coat: HEPA-vac and apply soot-/smoke-appropriate cleaners to surfaces before encapsulants.
- Deodorize strategically: Source removal first; thermal fogging or hydroxyls as needed—never to mask ongoing moisture.
For a deeper dive into industry standards for water damage restoration procedures, see the IICRC S500 standard (helpful overview here: IICRC S500 Water Damage Restoration). ← (outbound link)
Insurance coordination that speeds approval
- Scope alignment: Tie each removal to readings and regulations (e.g., wet insulation, swollen MDF, delaminated OSB).
- Xactimate-ready notes: Document line items with photos, sketches, and meter logs.
- Change orders: If a wall that tested dry on Day 1 wicks moisture by Day 3, update the scope and get quick sign-off.
When to consider abatement testing
Older structures and some commercial buildings may hide asbestos-containing materials (ACM) or lead paint. Before aggressive drying or removals:
- Test suspect materials (flooring mastics, textures, old plaster, pipe wrap).
- Follow containment protocols if positive, and switch to negative pressure with HEPA filtration to prevent cross-contamination.
TSIAC International’s team coordinates testing and abatement with the same speed as the drying plan to keep the schedule on track.
Common mistakes (and how we avoid them)
- Mistake: Turning on heat without dehumidification.
Fix: Always pair temperature control with dehumidifiers to move moisture out, not just around. - Mistake: Over-drying hardwoods and framing.
Fix: Track species-specific targets; taper equipment as you approach equilibrium. - Mistake: Drying through intact vapor barriers.
Fix: Open smart paths—remove baseboards, drill and plug, or temporarily remove low-perm coverings. - Mistake: Skipping cavity checks behind tile and stone.
Fix: Use non-destructive meters and borescopes to validate; plan selective tile removal only if necessary.
Sample drying plan (48–96 hours)
- Day 0–1: Extract; set 1 air mover per 10–14 linear feet of wall; install 1 LGR per 300–400 sq ft of moderately wet area (adjust for load); establish HEPA filtration.
- Day 1–2: Re-map; cut access where readings remain high; pull wet insulation; add cavity drying.
- Day 2–3: Step down equipment as GPP drops and materials approach targets; begin cleaning/deodorization.
- Day 3–4: Verification day—equipment off for 24 hours; confirm stable readings; close cavities and move to build-back.
Why choose TSIAC International for post-fire water mitigation
- Data-driven decisions: We don’t guess; we measure and adjust daily.
- Selective, not excessive: We save what can be saved and remove only what can’t—from surgical flood cuts to fully managed interior gut demolition when conditions require it.
- One coordinated team: Drying, selective demolition, abatement coordination, and restoration move in a single, efficient sequence—no hand-offs that stall progress.
- Clear documentation: Insurers get clean logs, photos, and moisture graphs to accelerate approvals.
Ready to stop secondary damage?
If a fire has just been extinguished—or you’re staring at wet drywall and smoky framing from days ago—act now. The sooner we start, the more we save.
TSIAC International designs and executes drying plans that protect structures, budgets, and timelines. Call us to schedule an on-site moisture map and same-day stabilization, and let’s prevent a salvageable loss from becoming a total rebuild.
Need help today? TSIAC International can deploy emergency extraction, dehumidification, and a written drying plan within hours. We coordinate with your adjuster, document every reading, and only recommend demolition when it’s truly necessary.
